
| VPN Firewalls |
Don’t we all lock the door when we are leaving our house or when we are asleep or in general to prevent dirt or unknown persons from entering our home? I guess we all do. A computer other than an air-gapped one is just like that. Hence a ‘firewall’ (A tool to prevent unauthorized users from gaining access to a computer network or that monitor transfers of information to and from the network) is a must. Every modern OS comes with a built-in firewall. It is recommended to keep your firewall enabled all the time since Day 1 or your first boot is possible.
I recommend you to check your OS’s firewall and enable it immediately if it is not for some reason. Just because your OS comes with a firewall it is not necessary that it is enabled by default.
What is VPN firewall or a kill switch?
VPN firewall or a ‘kill switch’ can be defined as a set of firewall rules designed to prevent unencrypted Internet access or to specifically allow Internet access via a VPN server or gateway. Thereby preventing any sort of leaks that might occur owing to abrupt disconnection of VPN even when you are not actively monitoring your system or using it.
A VPN firewall or kill switch could be implemented in a number of ways.
Traditionally, a custom software for a VPN service is developed and it manages the ‘Kill Switch’ function for you. There are some issues involved. For example the software could crash and then your firewall rules might not be working since it was designed in such a way that rules are only active until the software is open etc. Or it could be leaving some of the firewall rules behind even when it is completely closed which might cause issues later on. Also most custom VPN software are not not well maintained and not using production ready stable OpenVPN releases, you could be using a vulnerable or defective OpenVPN version which is the very core of VPN tunneling.
How to manually setup a VPN kill switch or firewall?
The idea is to block or drop every connection but connection to the VPN server at a particular port using a specific protocol. And allowing all connections exclusively via VPN tunnel. Such that in case VPN connection breaks or disconnects for any reason, the system is in a state where the only thing that would work is connection to the a specific VPN server at a particular port using a specific protocol.
Mission:
Create a manual kill switch or VPN firewall to prevent any leaks including but not limited to DNS leaks outside VPN network at all hence completely denying Internet access on a given system without an active encrypted VPN connection.
(Note: Some of the people might suggest you to allow DNS queries via your default gateway but I don’t. So, if you wish to allow it, you are at liberty to do so. That being so, I would only recommend it if you are using a reliable no-logs DNScrypt provider’s IP at a particular port using a particular protocol via default gateway.)
Prerequisites:
1. IP address or netblock of the VPN gateway you wish to setup for VPN kill switch.
For the purpose of this guide I am going to use my favorite no-logs vanilla OpenVPN provider AzireVPN‘s Swedish servers IPv4 netblock viz. 193.180.164.32/27
In order to find out the IP address of VPN server you can use either ping or host command followed by the hostname are provided by your VPN provider in client configuration files for OpenVPN. Syntax for host command would be:
$ host se.ovpn.azirevpn.net
You can replace se.ovpn.azirevpn.net with the host name as provided by your VPN service.
2. Name of the network interface connected to your default gateway or Internet and subnet of your local network.
For the purpose of this guide I am going to use wlp6s0 as network interface and 192.168.0.0/24 as the subnet of local network.
In order to find out both the details we use route command. Keep in mind it requires root or sudo access. Syntax for route command would be:
# route
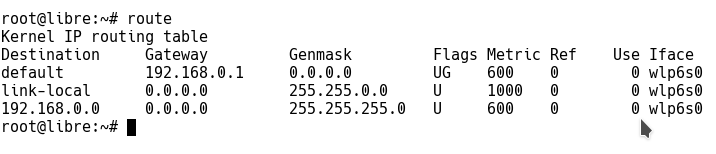
As you can see in the picture above Iface value in the table gives you your network interface name and the last line gives you the subnet of your local network in ideal situations.
3. Changes in Client .ovpn configuration file as follows:
a. Set the tun device to –dev tun0 in client configuration file, if not set already.
dev tun0
b. Change host names to IPs for –remote option in client configuration file (Note: This step is not required for those who allowed DNS nameservers in the VPN firewall via default gateway).
Your client configuration file for OpenVPN would have host names in –remote as follows:
remote se.ovpn.azirevpn.net 1194
We must change the host name se.ovpn.azirevpn.net here to IPs it has. We can find all the IPs as follows:
$ host se.ovpn.azirevpn.net
se.ovpn.azirevpn.net has address 193.180.164.50
se.ovpn.azirevpn.net has address 193.180.164.42
se.ovpn.azirevpn.net has address 193.180.164.52
se.ovpn.azirevpn.net has address 193.180.164.40
se.ovpn.azirevpn.net has address 193.180.164.35
se.ovpn.azirevpn.net has address 193.180.164.45
se.ovpn.azirevpn.net has address 193.180.164.51
se.ovpn.azirevpn.net has address 193.180.164.34
se.ovpn.azirevpn.net has address 193.180.164.39
se.ovpn.azirevpn.net has address 193.180.164.41
se.ovpn.azirevpn.net has address 193.180.164.47
se.ovpn.azirevpn.net has address 193.180.164.48
se.ovpn.azirevpn.net has address 193.180.164.46
se.ovpn.azirevpn.net has address 193.180.164.36
se.ovpn.azirevpn.net has address 193.180.164.37
se.ovpn.azirevpn.net has address 193.180.164.44
se.ovpn.azirevpn.net has address 193.180.164.53
se.ovpn.azirevpn.net has address 193.180.164.43
se.ovpn.azirevpn.net has address 193.180.164.38
se.ovpn.azirevpn.net has address 193.180.164.49
–remote in client configuration file would change to follows from remote se.ovpn.azirevpn.net 1194:
remote 193.180.164.50 1194
remote 193.180.164.42 1194
remote 193.180.164.52 1194
remote 193.180.164.40 1194
remote 193.180.164.35 1194
remote 193.180.164.45 1194
remote 193.180.164.51 1194
remote 193.180.164.34 1194
remote 193.180.164.39 1194
remote 193.180.164.41 1194
remote 193.180.164.47 1194
remote 193.180.164.48 1194
remote 193.180.164.46 1194
remote 193.180.164.36 1194
remote 193.180.164.37 1194
remote 193.180.164.44 1194
remote 193.180.164.53 1194
remote 193.180.164.43 1194
remote 193.180.164.38 1194
remote 193.180.164.49 1194
We are done with all the changes required in client configuration file for OpenVPN. Moving on to the core i.e. VPN firewall section.
Let’s start!
GNU/Linux users:
Majority of GNU/Linux users either use iptables or ufw to manage their firewall. So lets use both of them separately to setup a VPN Kill Switch for your OpenVPN provider.
1. VPN killswitch or firewall using “iptables”
(Note: You are advised to backup your current iptables ruleset in case something goes wrong.)
I already wrote iptables ruleset for you. Here take a look:
#!/bin/bash
iptables --flush
iptables --delete-chain
iptables -t nat --flush
iptables -t nat --delete-chain
iptables -P OUTPUT DROP
iptables -A INPUT -j ACCEPT -i lo
iptables -A OUTPUT -j ACCEPT -o lo
iptables -A OUTPUT -j ACCEPT -d 193.180.164.32/27 -o wlp6s0 -p udp -m udp --dport 1194
iptables -A INPUT -j ACCEPT -s 	193.180.164.32/27 -i wlp6s0 -p udp -m udp --sport 1194
iptables -A INPUT -j ACCEPT -i tun0
iptables -A OUTPUT -j ACCEPT -o tun0
iptables -A INPUT --src 192.168.0.0/24 -j ACCEPT -i wlp6s0
iptables -A OUTPUT -d 192.168.0.0/24 -j ACCEPT -o wlp6s0
ip6tables --flush
ip6tables --delete-chain
ip6tables -t nat --flush
ip6tables -t nat --delete-chain
ip6tables -P OUTPUT DROP
ip6tables -A INPUT -j ACCEPT -i tun0
ip6tables -A OUTPUT -j ACCEPT -o tun0
You can copy iptables and ip6tables rules from above and save it as iptables-ks.sh for your convenience to edit/execute them.
What it does is expunges every ruleset in iptables/ip6tables and outright drops every outgoing connection other than to netblock we have allowed that to at a particular port using a specific protocol.
Open a terminal and gain sudo access or root access and do as follows:
# chmod +x iptables-ks.sh
# ./iptables-ks.sh
Congrats! Your VPN kill switch or firewall is active. No Internet connection is possible now other than via AzireVPN.com”s Swedish servers netblock 193.180.164.32/27 using UDP protocol at port 1194. So unless you connect to it, Internet access is completely denied.
These settings are temporary and would be wiped upon reboot. In order to prevent it you might need to install “iptables-persistent” package for your distribution.
Or set it to run on boot by adding this line to the end of /etc/crontab:
@reboot root /path/iptables-ks.sh
2. Hello “ufw” users.
(Note: We recommend you to backup your current firewall ruleset.)
First install ufw in case you did not:
# apt-get install ufw
I already wrote ufw ruleset for you. Here take a look:
ufw --force reset
ufw default deny incoming
ufw default deny outgoing
ufw allow in on tun0
ufw allow out on tun0
ufw allow in on wlp6s0 from 192.168.0.0/24
ufw allow out on wlp6s0 to 192.168.0.0/24
ufw allow out on wlp6s0 to 193.180.164.32/27 port 1194  proto udp
ufw allow in on wlp6s0 from 193.180.164.32/27 port 1194 proto udp
ufw enable
You can copy the ufw rules from above and save it as ufw-ks.sh for your convenience to edit/execute them.
Open a terminal and gain sudo access or root access and do as follows:
# chmod +x ufw-ks.sh
# ./ufw-ks.sh
Congrats! Your VPN kill switch or firewall is active. No Internet connection is possible now other than via AzireVPN.com’s Swedish servers netblock 193.180.164.32/27 using UDP protocol at port 1194. So unless you connect to it, Internet access is completely denied.
Mac OS X users:
In order to setup kill switch or VPN firewall on OS X, we are going to use a command line tool called pf.
Make sure you have sudo or root access before we start.
Let us begin by editing the configuration file of pf at /etc/pf.conf in a terminal window as follows:
# nano /etc/pf.conf
In order to block all the connections other than to netblock or IP of VPN server(s) at a port using a particular protocol, we we would append /etc/pf.conf and add the following lines:
block drop all
pass on lo0
pass on utun0
pass out proto udp from any to 193.180.164.32/27 port 1194
Save and exit.
Once you are done editing the file. Let us import the newly added rules as follows:
# pfctl -f /etc/pf.conf
Lets turn on the firewall which is not ON by default as follows:
# pfctl -e
Once the pf is enabled. Congrats! Your VPN kill switch or firewall is active. No Internet connection is possible now other than via AzireVPN.com’s Swedish servers netblock 193.180.164.32/27 using UDP protocol at port 1194. So unless you connect to it, Internet access is completely denied.
Microsoft Windows (Work in progress):
WIP! Since I am not a native user of Windows since years now, I am still finding options to setup a reliable manual Kill switch for it. Please go thru the below solution using routes until I dive into Windows Powershell and come back with a reliable solution.
Note: Ignore the above stated prerequisites for this section completely
So the idea with routes is to delete the default route once the OpenVPN connection has been established.

In order to delete the default route you would require a command prompt with Admin rights. (Make sure you have an active VPN connection). Once you have that open command prompt do as follows:
route delete 0.0.0.0
Upon successful deletion, it would give you a confirmation message “OK!” in a new line as seen in the image above. So, what happens now is, even if your VPN connection gets interrupted or disconnected for whatever reasons. The system don’t have a valid default route only to reach Internet. So it creates a basic VPN kill switch for Windows OS.
Drawbacks of using this method is that is not persistent. The default route gets reproduced upon disabling / enabling an adapter or reboot. It is really a problem if you are accessing Internet over unstable Wifi signal etc or if you have no power backup for routers at home and if you have electricity interruption like a dozen times in a week, which is fairly common in 3rd world.
Thanks for reading! Comments and suggestions are invited.


4 Comments
Gagan
6 August, 2017Nifty tips, thanks for such informative article buddy.
Alex
6 August, 2017Hi,
This is very handy. However, please note that any server you put on tun0 will be visible to the world (ssh/webmin) unless you bind those servers to the interface. To that end, I block everything by default, and expressly open up ports I need, which amounts to a total of 2 ports total. Here is my ufw.sh for Ipredator VPN + transmission bt.
ufw reset
ufw default deny incoming
ufw default deny outgoing
ufw allow in on tun0 to any port 51413 proto tcp comment ‘was ufw allow in on tun0’
ufw allow in on tun0 to any port 35101 proto udp
ufw allow out on tun0
ufw allow in on eth0 from 192.168.1.0/24
ufw allow out on eth0 to 192.168.1.0/24
ufw allow out on eth0 to 46.246.35.130/32 port 1194 proto udp
ufw allow out on eth0 to 46.246.35.2/32 port 1194 proto udp
ufw allow out on eth0 to 46.246.36.130/32 port 1194 proto udp
ufw allow out on eth0 to 46.246.37.130/32 port 1194 proto udp
ufw allow out on eth0 to 46.246.38.130/32 port 1194 proto udp
ufw allow out on eth0 to 46.246.39.130/32 port 1194 proto udp
ufw allow out on eth0 to 46.246.39.2/32 port 1194 proto udp
ufw allow out on eth0 to 46.246.40.130/32 port 1194 proto udp
ufw allow out on eth0 to 46.246.41.2/32 port 1194 proto udp
ufw allow out on eth0 to 46.246.42.130/32 port 1194 proto udp
ufw allow out on eth0 to 46.246.42.2/32 port 1194 proto udp
ufw allow out on eth0 to 46.246.43.130/32 port 1194 proto udp
ufw allow out on eth0 to 46.246.61.130/32 port 1194 proto udp
ufw allow out on eth0 to 46.246.62.130/32 port 1194 proto udp
ufw allow out on eth0 to 46.246.63.130/32 port 1194 proto udp
ufw allow in on eth0 to 46.246.35.130/32 port 1194 proto udp
ufw allow in on eth0 to 46.246.35.2/32 port 1194 proto udp
ufw allow in on eth0 to 46.246.36.130/32 port 1194 proto udp
ufw allow in on eth0 to 46.246.37.130/32 port 1194 proto udp
ufw allow in on eth0 to 46.246.38.130/32 port 1194 proto udp
ufw allow in on eth0 to 46.246.39.130/32 port 1194 proto udp
ufw allow in on eth0 to 46.246.39.2/32 port 1194 proto udp
ufw allow in on eth0 to 46.246.40.130/32 port 1194 proto udp
ufw allow in on eth0 to 46.246.41.2/32 port 1194 proto udp
ufw allow in on eth0 to 46.246.42.130/32 port 1194 proto udp
ufw allow in on eth0 to 46.246.42.2/32 port 1194 proto udp
ufw allow in on eth0 to 46.246.43.130/32 port 1194 proto udp
ufw allow in on eth0 to 46.246.61.130/32 port 1194 proto udp
ufw allow in on eth0 to 46.246.62.130/32 port 1194 proto udp
ufw allow in on eth0 to 46.246.63.130/32 port 1194 proto udp
ufw enable
Manisha Gehlot
6 August, 2017Good suggestion. I appreciate it. In case of Public IP VPN with all incoming ports open, it must be adopted.
François
6 August, 2017Hi,
Did you consider not allowing incoming traffic on the tunnel interface, or at least restricting it to a set of expected ports?
The following line means that any software listening on all interfaces will likely be available to all other users of the VPN.
iptables -A INPUT -j ACCEPT -i tun0
I would instead suggest using a combination to:
# 1. Allow responses to come through
iptables -A INPUT -m conntrack –ctstate RELATED,ESTABLISHED -j ACCEPT
# 2. Optionally allow a set of incoming connections on expected ports, e.g. HTTPS
iptables -A INPUT -p tcp –dport 443 -j ACCEPT
Another suggestion would be to explicitly reject incoming and outgoing packets instead of dropping them. That way users can identify the firewall blocking the communication instead of seeing timeouts. For example, the following rules should do:
iptables -A INPUT -p tcp -j REJECT –reject-with tcp-reset
iptables -A INPUT -p udp -j REJECT –reject-with icmp-port-unreachable
iptables -A INPUT -j REJECT –reject-with icmp-proto-unreachable
iptables -A OUTPUT -p tcp -j REJECT –reject-with tcp-reset
iptables -A OUTPUT -p udp -j REJECT –reject-with icmp-port-unreachable
iptables -A OUTPUT -j REJECT –reject-with icmp-proto-unreachable