From making product demos to recording presentations, there could be so many reasons for recording your system’s screen. Since the inbuilt recording features of Windows 10 are not so effective, you might wish to use dedicated screen recorders. Therefore, in this post, I will let you know how to record the computer screen and even edit your recorded videos like a pro.
Part 1: What’s the Need for a Video Recorder and Editor Tool?
Ideally, there could be plenty of reasons to use a screen recorder for pc. For instance, you might wish to record your screen in the following scenarios:
Product Demos
In case you want to record a video tutorial of any software, then a screen recorder would come in handy. You can easily explain the overall working of your tool and even create tutorial videos.
Video Presentations
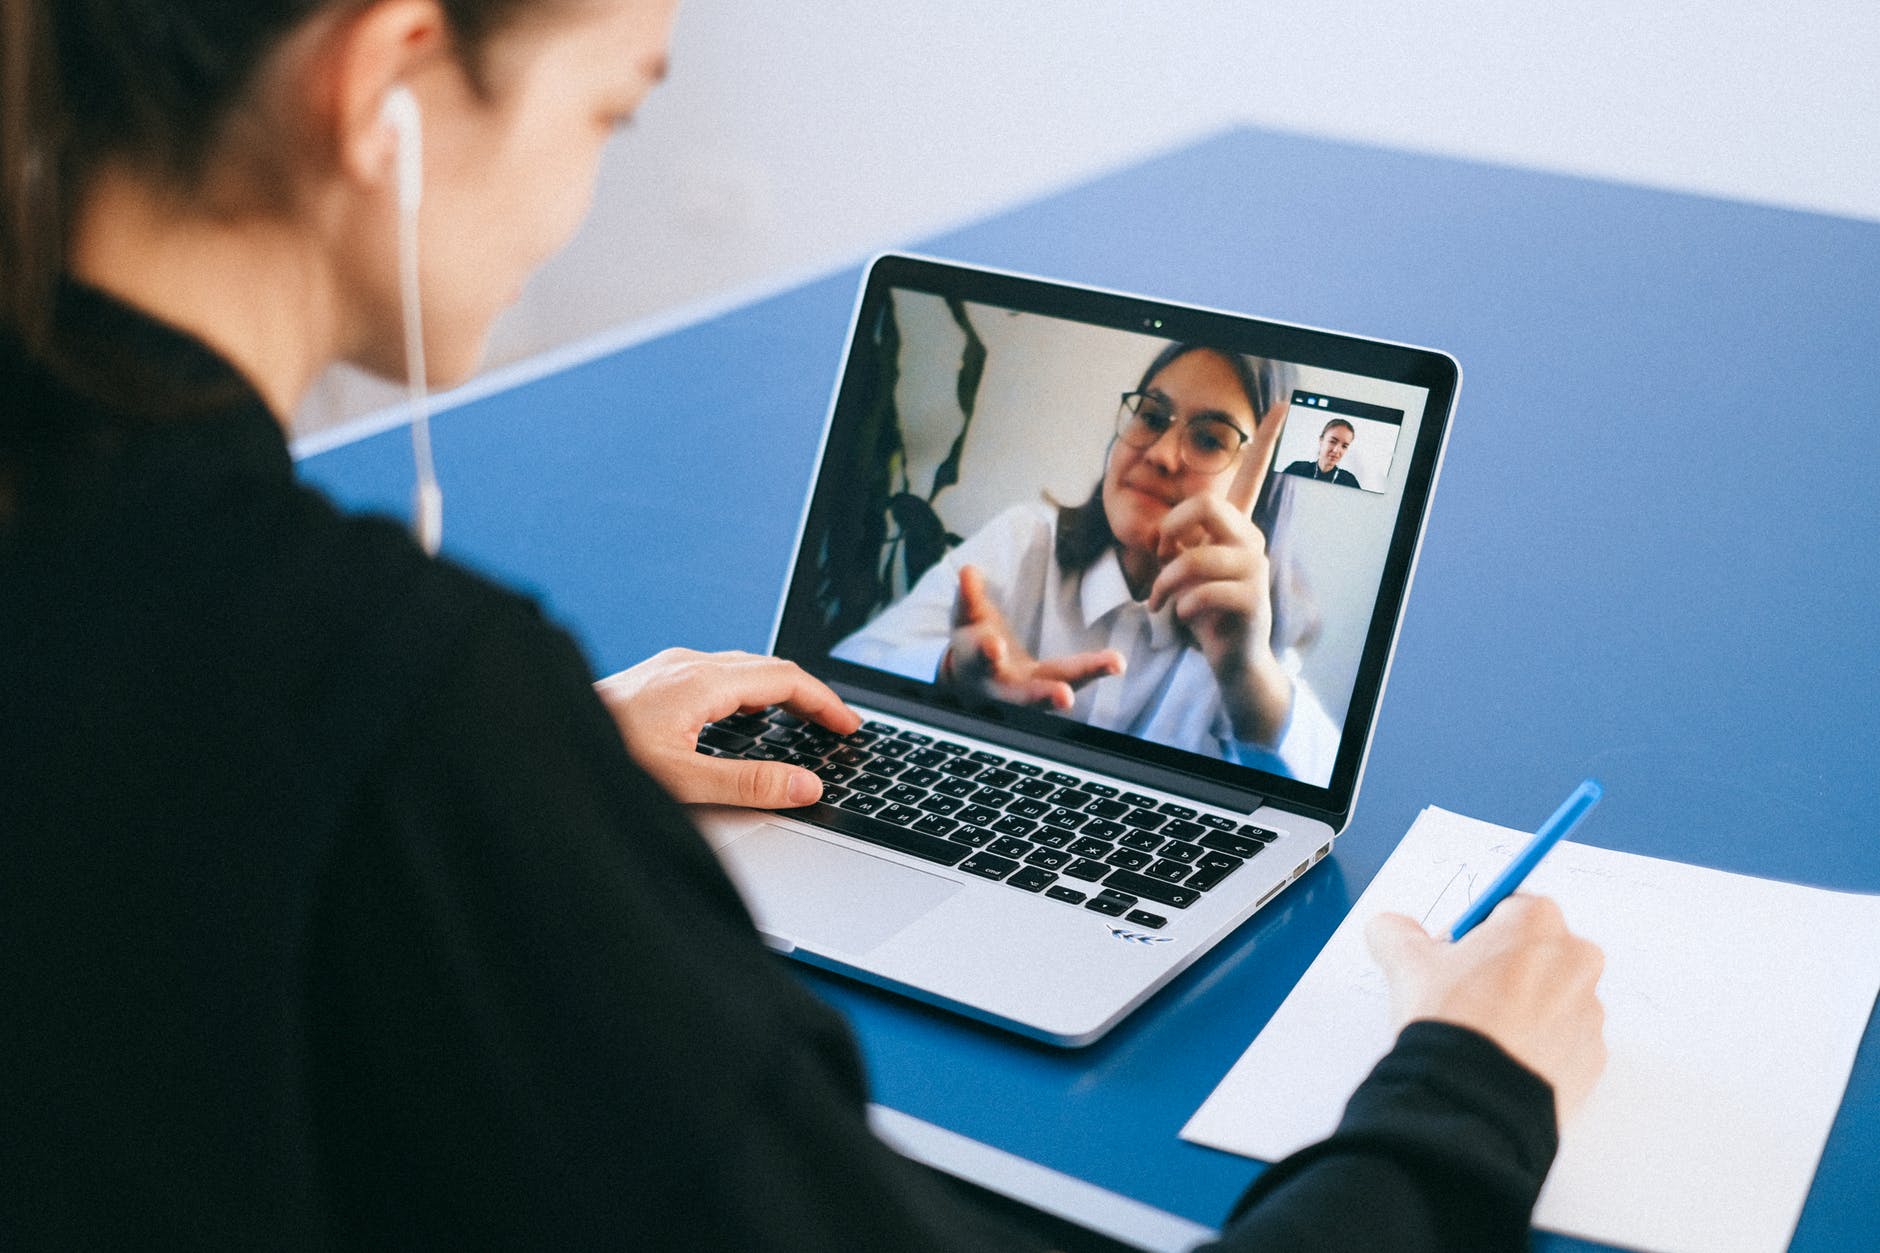
From marketing presentations to research proposals, you can come up with all kinds of video presentations with a screen recorder. Unlike standard presentations, videos would be more engaging and will help you convey anything in a more visually appealing manner.
Online Lectures
If you are an educator, then a video recording tool would be a must-have tool. You can easily record your lectures in advance, make on-demand videos, and do so much more with a screen recorder for pc.
Other Scenarios
Apart from that, video recorders and editing tools can be used by students, marketing professionals, gamers, and so on. You can also use them to review codes and share the results of the quality testing process of a product.
Part 2: Wondershare DemoCreator: The Best All-in-One Video Recorder and Editor
To record the screen, you can consider using Wondershare DemoCreator, which is a professional video recording and editing application. Unlike the native computer screen recorder, DemoCreator has tons of advanced features that would let you record your system’s screen, webcam, and microphone at the same time.
3 Recording Modes
DemoCreator offers three dedicated recording modes that you can readily choose for an instant video recording experience.
- New Recording: To record your system’s screen + webcam + audio (microphone/system’s sound)
- Record Screen: To record the system’s screen + audio (without its webcam input).
- Record Game: To instantly record gameplays (can integrate webcam or audio inputs).
Extremely User Friendly
Using DemoCreator is quite simple, and it has a zero learning curve. You can just launch what you wish to record and start the recording of videos from DemoCreator. Later, you can save the recordings and export them into different formats.
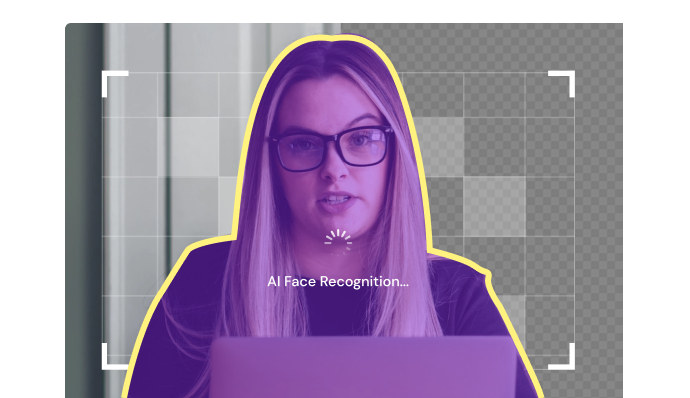
AI Face Recording
While recording your videos, you can use its inbuilt AI face recognition features that would automatically remove the background. You can also access this feature while editing your videos.
Inbuilt Video Editor
Apart from recording your videos, you can also edit them on DemoCreator and apply all kinds of transitions, filters, overlays, stickers, and other effects.
Part 3: How to Record Your Computer Screen with DemoCreator?
Now when you are familiar with all the major features of DemoCreator, let’s learn how to record a computer screen with it. Ideally, you can just install DemoCreator on your Windows 7/ Windows 8/ Windows 10 PC and follow these steps to record your screen with its audio or webcam inputs.
Step 1: Launch DemoCreator and Select a Recording Mode
At first, you just have to install Wondershare DemoCreator on your system and launch it whenever you wish to record your screen. From its home, you can select either of its three recording modes – New Recording, Record Screen, or Record Game.

Step 2: Set up your Camera and Audio Input
Great! Now, you will get the following screen where you can set up all kinds of details for your recording. For instance, you can manually adjust the area for recording or simply enter their values on DemoCreator. You can also set up a recording device like your microphone, systems’ audio, or the connected webcam from here.


For instance, you can select a circular or a rectangular frame from here for your webcam. There is also a mirror mode to correct the alignment of the camera input. The best feature would be the AI Face Recognition mode that would automatically detect your face and will remove the background from the camera input.
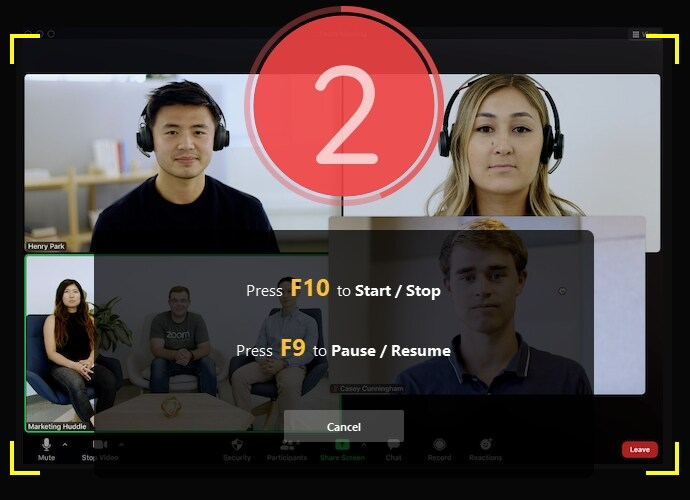
Step 3: Start Recording your Video with DemoCreator
That’s it! After taking care of all the prerequisites, you can click on the Start Recording button (the red icon) from its corner. You can also enable a screen drawing toolbar from here if you want to.

Part 4: Edit your Videos like a Pro with DemoCreator
As I have listed above, DemoCreator also offers an inbuilt video editing tool. You can access its “Video Editor” mode from its home to load your recorded or any other video. Besides making all the basic video edits, these are some of the major features that I liked in the DemoCreator Windows 10 screen recorder.
Start Editing Your Videos
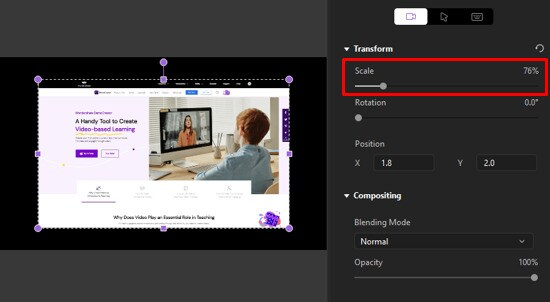
At first, you can just import the video on DemoCreator and drag and drop it to the timeline. Here, you can find the screen recording and the webcam recording videos in different tracks (so that you can edit them easily). There are all kinds of video editing options to crop, scale, resize, trim, flip, rotate, and do all kinds of basic edits that you can use.
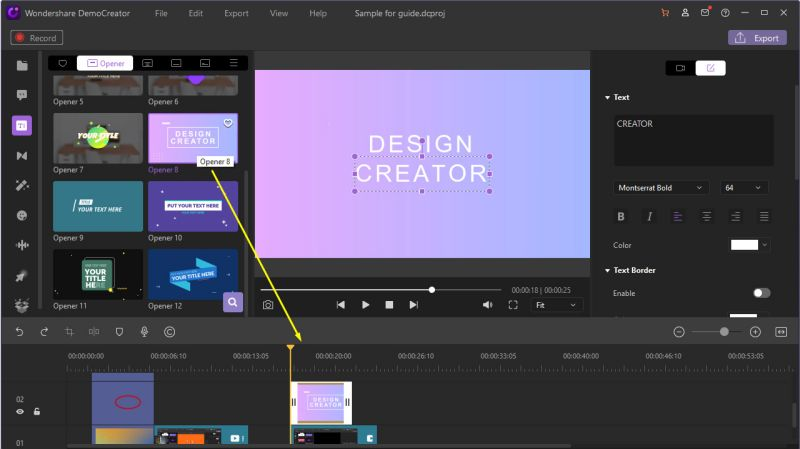
Add a Stunning Caption Effect
Say goodbye to having the same old boring openers for your videos with DemoCreator. One of the best features of its video editor is a dedicated Caption (Text Overlay) effect.
After adding your video to its timeline, you can just go to the “Caption” tab from the left toolbar. Here, you can find four different kinds of caption effects – Opener, End Credit, Subtitle, and Lower-third.

Now, let’s say you want to display a visually stunning caption at the starting of the video. In this case, you can go to the Opener section and select any caption effect of your choice. You can now just drag and drop it to the video on the timeline and enter the desired text.
In the same way, you can also add all sorts of visually appealing end credits or subtitles for your videos.
Apply All Kinds of Webcam Video Effects
Apart from accessing AI facial recognition options while recording your videos, you can also use the same features in its editor. Just go to the Effects option from the top to explore features like AI Facial Recognition, Mask, Mirror, and so on. With the AI Facial Recognition option, you can automatically remove the background from your recorded video.

Besides that, you can also apply numerous other effects like pan-and-zoom, green screen, cinema, etc. from here.
Explore Hundreds of Visual Effects
If you want, you can also go to the Cursor Effects feature of the application from the sidebar. This will let you focus on any particular area on the screen or apply numerous effects for the movement of your cursor in the recorded video.
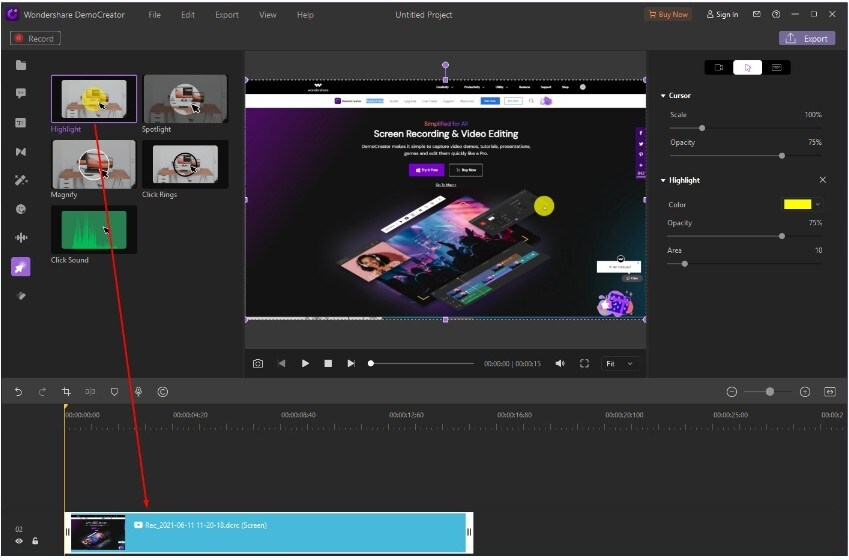
Furthermore, there are hundreds of transitions, filters, overlays, stickers, and other effects that you can explore in DemoCreator. The application also features an Effects Store where you can find hundreds of ready-made effects in different categories.
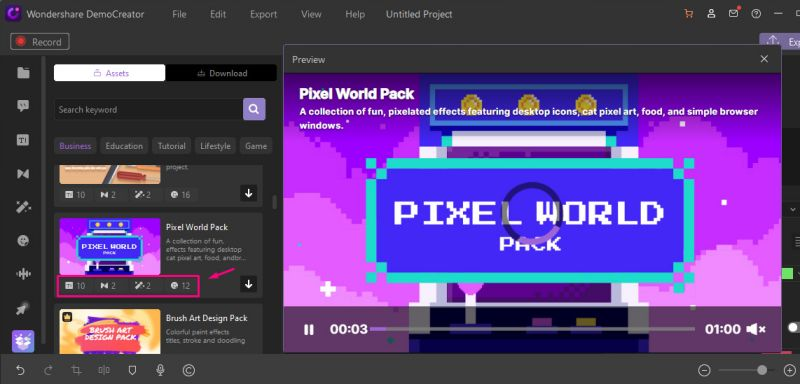
Use Readily Available Sound Effects
This is another prominent feature in DemoCreator that I enjoyed using. You can simply add or remove any kind of sound effect to your videos. Just go to the Sounds Pack tab from the corner to drag and drop any effect on your video on the timeline.

For instance, if you are an educator, then you can add effects like Correct Answer, Wrong Answer, Question Ring, and so on. There are also dedicated options to further adjust the level of the added sound effect and make other changes in it.
Part 5: Final Words
With a tool like Wondershare DemoCreator, you can easily make educational, promotional, or professional videos. The application can help you record the screen on the computer and even edit your videos, all in one place. The screen recorder for Windows and Mac is extremely easy to use and will certainly meet your requirements to make stunning tutorials, presentations, gameplays, and so on. It even offers an AI face recognition feature and is packed with tons of editing tools to help you come up with memorable and visually appealing videos for sure.