
Resizing and scaling video is an important aspect of video-editing. It only takes a convenient, easy-to-use software that makes it easy for hardcore editors. Especially, with ABR streaming, users have to change bitrate-resolutions starting from 1920px1080p to ABR bitstreams 1280px720.

For that, first, we need to take a look at what input resolution and output resolution is. With the use of ffprobe tool, shipped from FFmpeg can easily result in the input resolution. The command line for ffprobe is as follows:
ffprobe -v error -select_streams v:0 -show_entries stream=width, height -of csv=s=x:p=0 input.mp4
Let’s look at how we can do the following in FFmpeg:
1. Resize videos in FFmpeg
Select the ‘Scale’ filter from the Effects section of FFmpeg. Enter the following command to resize videos: FFmpeg -i input.mp4 -vf scale=$w:$h <encoding-parameters> output.mp4
$w & $h here, indicate the necessary width and height. For example, -vf scale=480p. Your video will be resized accordingly.

2. Simple Rescaling
To rescale videos with ease, you’ll have to follow this command:
FFmpeg -i input.avi -vf scale=320:240 output.avi
3. Keeping the Aspect Ratio
To be able to maintain the aspect ratio whilst changing the resolution can be difficult. The aspect ratio means the ratio of the image’s width to its height.
For e.g. if the width of the image is x unit and the height is y unit, the aspect ratio would be x : y.
While resizing a video & retaining the aspect ratio, we need to set the parameters in a particular way i.e, to set either the width or the height to -1.
For example- we set the width to -1 and then set the height and vice versa.
In order to change the resolution whilst keeping the aspect ratio intact, here’s what is to be considered-

For example, if we are selecting the resolution, let’s choose 1920×1080. This can be done using two methods:
- Specify the width:
In order to get the resolution of 320×180, this following command is to be followed:
FFmpeg -i input.mp4 -vf scale=320:-1 output.mp4
The video will result in a resolution of 320×180. This happens because 1920/320 = 6 which equals to 180 pixels.
- Specify the height:
FFmpeg -i input.mp4 -vf scale=-1:720 output.mp4
This will give us a resolution of 1280×720. This is because 1080/720= 1.5. Hence, the width is supposed to be scaled at 1920/1.5= 1280 pixels.
4. Using Variables
Here, we can make use of the same scaling commands with the use of variables that indicate the parameters of a video. But we have to specify the height and width for the output image.
The width and height of the input video is by iw and ih respectively.
Let’s see what command to scale the video’s width two times (2x) looks like.
FFmpeg -i input.mp4 -vf scale=iw*2:ih output.mp4
If we divide either the height or width by a particular number, the syntax changes this way; scale=iw/2:ih/2 because the argument has to be enclosed between double-quotes.
The actual command: FFmpeg -i input.mp4 -vf "scale=iw/2:ih/2" output.mp4

5. Avoiding Upscales
Every upscaled video does not display the exact video quality it did before undergoing the process. Video quality might suffer here. There could also occur compression losses. When it comes to input resolution, FFmpeg has helpful tricks to offer to avoid upscaling.
In the following command line, width & height are respectively set to 320&420 pixels.
FFmpeg -i input.mp4 -vf "scale='min(320,iw)':'min(240,ih)'" output.mp4
Now that we know how to use the software, let’s consider its pros & cons.
Pros:
- FFmpeg provides apt codec and filter support.
- It supports all major types of video/audio format.
Cons:
- It isn’t as user-friendly for beginners.
- The accessibility for cross-platform support is limited.
In order to run this software smoothly, it is necessary that you how the commands for the same very well. Here is a list of commands for various functions:
6. Crop a video file
To crop a video file is the most basic function in a video application. FFmpeg includes a crop filter for the same:
FFmpeg -i input.mp4 -filter:v "crop=out_w:out_h:x:y" output.mp4
Here,
- out_w stands for the width of the output rectangle.
- out_h denotes the height of the output rectangle.
- x and y specify the top left corner of the output rectangle
- output.mp4 stands for the output file
7. Extract a portion of a video
Another function that is so integral when it comes to video-editing is extracting a video. Here’s how it can be done:
FFmpeg -ss 00:00:15 -i orginalfile.mpg -t 00:00:05 -vcodec copy -acodec copy newfile.mpg
in the above example, we are about to cut a part that starts at 15 seconds into the original file with 5 seconds length. Here, -s denotes starting time, -t indicates the duration.
8. Encode a Video Sequence for the iPod/iPhone
We can easily convert videos for iPad, iPhones, and iPods using the following command.
FFmpeg -i source_video.avi input -acodec aac -ab 128kb -vcodec mpeg4 -b 1200kb -mbd 2 -flags +4mv+trell -aic 2 -cmp 2 -subcmp 2 -s 320x180 -title X final_video.mp4
9. Extract sound from a video, and save It in MP3 format
Extracting audio from video is quite easy.
FFmpeg -i source_video.avi -vn -ar 44100 -ac 2 -ab 192k -f mp3 sound.mp3
10. Convert a WAV File to MP3
FFmpeg also eases the process of working with audio files. The command mentioned below will convert .wav file into mp3.
FFmpeg -i input_sound.avi -vn -ar 44100 -ac 2 -ab 192k -f mp3 output_sound.mp3
11. Convert .avi to .flv
.flv is widely used format for web videos. This particular format will help you convert files from .avi to .flv . We have to specify the necessary parameters such as display size.
FFmpeg -i original_video.avi -ab 56 -ar 44100 -b 200 -r 15 -s 320x240 -f flv final_video.flv
12. Compress .avi video
Compressing .avi videos help you save space on the hard drive. We must remember to use the -s parameter to resize the output file.
FFmpeg -i original_video.avi -s 320x240 -vcodec msmpeg4v2 final_video.avi
13. Convert .avi to animated gif (Uncompressed)
There’s also an easy way to convert video files into animated gif.
FFmpeg -i original_video.avi animated_gif.gif
14. Mix a video with a sound file
Yes, we can mix audio & video files using this command:
FFmpeg -i sound.wav -i original_video.avi final_video.mpg
15. Add Text Subtitles to a Video
Text subtitles can be added to a video with this command.
FFmpeg -i input.mp4 -i subtitles.srt -c copy -c:s mov_text output.mp4
However, there is an easier alternative for the same to save you the hassle. Especially, if you are a beginner it might be difficult for you to get a hold of this software.
Therefore, here’s introducing you to a convenient software:
iMyFone Filme
This software is accurate for beginners due to its easy way of operating. Also, it adds a professional layer to your videos.
Some of the features of the software are as follows.
- Prepares stunning slideshows with stunning templates within seconds.
- Video-editing can be done without deep technical knowledge i.e., cut/trim, split, crop adjust speed, rotate, making picture-in-picture effects, etc.
- Helps with the creation of quick cinematic titles & text with various fonts and colors to choose from.
For its wonderful effects, there’s a way to resize videos on this software
How can we resize/rescale videos on iMyFone Filme?
Step 1- Launch the software on your computer. Head to the File menu, then onto creating a ‘New Project’, and click on aspect ratios you wish to set.
Step 2- Now, we have to import the file. In order to import a video file, visit the Import option. Click on Import Files. Browse the file and add it to the project. After adding to the project, you’ll be able to see the video file in ‘My Media’.
Step 3- Now, drag the chosen video from the ‘My Media’ section to the timeline. Double click on the video to work out the editing options. You’ll spot the editing options on the right side of the window.
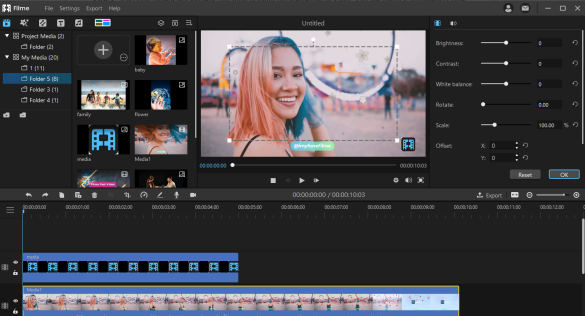
Step 4- For video scaling & resizing, you need to fine-tune the Scale percentage. You may regulate it according to your requirement. The Aspect Ratio of the video will remain identical. If you wish to turn the video smaller, reduce the percentage count to anything below 100%. You will be able to enter the required percentage.
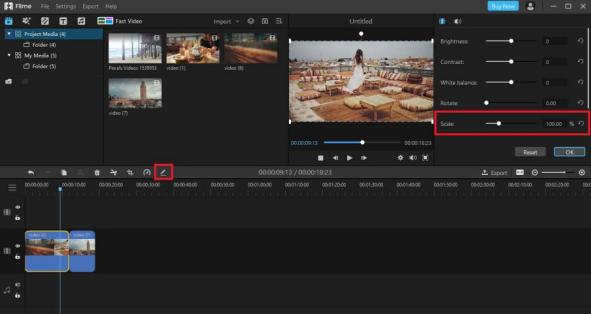
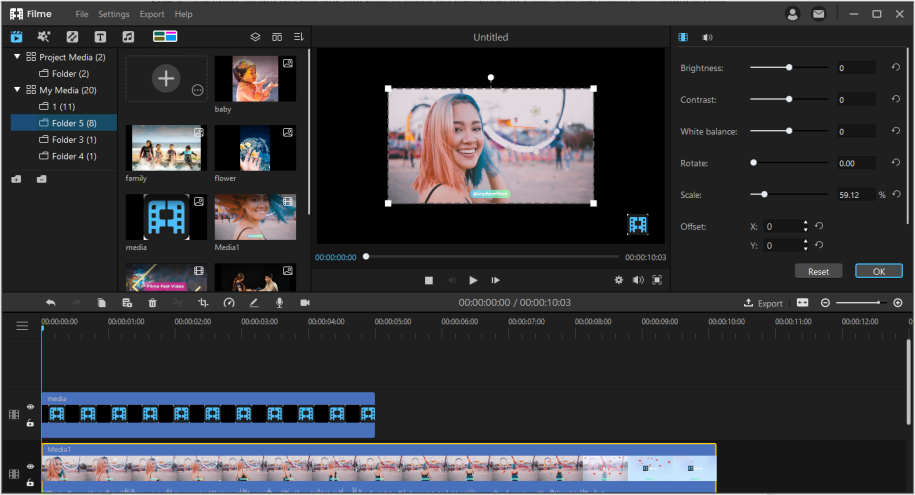
Step 4 (Alternate)- Once you decide on the video from the timeline, you can notice the borders on the preview video. Drag the corners to the maximum amount to regulate the scale of the video.
Step 5- After resizing, you may want to position the video. Position it where you wish it to be by dragging the video. You’ll also be able to enter values within the X and Y coordinates of the Offset property.
Step 6- Once you are done with this, visit the Export menu and click on Export Video. Enter the name, destination, and tap Export.
This was an easier way to resize your videos.