A component that helps to transfer ink onto the page is called the printer head. It transfers the ink to the page by firing small drops of ink through several outlets so that you can get your desired print. And whenever if some nozzle is blocked or gets congested, it will make your printing faded or streaky. To attain a high standard of printing, printer maintenance is essential. Any machine can break down if you don’t put proper attention to it – particularly when it comes to inkjet. No matter if you use branded, well-matched, or reused cartridges, there is a chance of the ink drying out and blockage the nozzle. This can cause further difficulties if not tackled properly and could even cause your printer to collapse. However, this can be solved by cleaning the print head. So this problem comes to every regular user of a printer, then the questions arise that how to clean Epson printer? Here are some of the steps through which you can clean the print head of your printer.
The cleaning of the printer heads
If you are facing the issue of printing of blank pages and your ink levels are normal, then most probably the problem is with the print heads of your printer. If you rarely use your printer, you can face this issue because, due to less usage, some of the ink may have dried out, which can create problems for you. To fix this, you need to clean your print heads. Another very common problem is the blurred printing of documents that will not fulfill your needs and requirements. And when you print images, in this case, you will find that images are missing one color throughout the paper. This problem is caused by CMYK cartridge that is not working properly.
The printer’s working depends on the layering of tiny dots in various types and with the range of different colors that we can notice with the naked eye. The Cyan, Magenta, Yellow, and key stands for CMYK, which is usually black. Every color has its nozzle exit, so if any of them is blocked due to some blockage, it will affect the whole printing process, and you have to clean the print head to root out this problem. After cleaning the nozzle, you will see clear improvements in the quality of printing.
But keep it in mind that you should avoid cleaning the print heads often because this cleaning process consumes a lot of ink. Clean the print heads only when you face some serious issues in the printing process. You can clean your printer’s print heads either manually or by making a command from your computer. Before you start printing, you can perform a nozzle check to confirm your print head needs cleaning or not, as this will save ink.
The process of Nozzle Check
You can perform the nozzle check of your printer through your printer’s control panel on the machine. There is another option of nozzle check that you can perform through your computer’s utility setting.
In the process of nozzle check via the printer’s control panel, you’ll need to look for the maintenance screen, Put the paper in the loading tray and select the option of print nozzle head check. Your printer will print a chart with lines. If there are some gaps in lines of some blurred effects, then you have to clean the print heads manually.
In the nozzle check process via computer utility settings, you have to open the printer utility option. You can find this option in the settings or task menu, and when you open the option of printers and scanners, select your printer and open the printer utility. Now select the option of nozzle check and see the results of the chart; if there are some issues in printed papers, then you should clean the print heads manually.
Manual cleaning of print heads
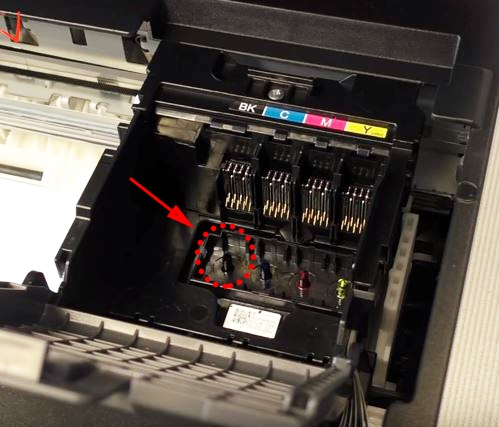
The manual process of cleaning the print heads is quite easy and straightforward. For this process, you need some things like a bottle of water and a paper towel. Make sure to remove the power supply of the printer to avoid any damage in the cleaning process. Now open the printer, and after locating the cartridge, remove the tray in which the cartridge sits in. This print head unit will have numerous holes in the bottom. In some of the printer models, there is a print head in the cartridge, and in this case, you should not clean the holes of the print head unit.
Now wet your cloth with some water and gently rub it on the electrical area until there is no new ink shows up on the cloth. Remove all the dried ink debris from the print head and its edges and ramps. Also, clean the material inside that area too. Use the water for soaking of the print head for around five minutes so that all the dried ink may lose if some have on the print head. Use a paper towel or dry cloth to remove any ink from the print head and moisture. Make sure to dry the unit thoroughly before placing it back into the printer. And when you complete this process, now perform and nozzle checks and sees the printer’s printing quality.
Conclusion
If you are facing poor printing issues and there is a need to clean your print heads, you can follow the above tips and make your printer work normal again. You can also apply these methods on your budget 3d printer. The regular users of printers often face the problems in printing, and they didn’t know how to clean the printer heads, so this article is a proper guide for printer users for the effective working of their printers. The cleaning of your print head is your duty; otherwise, you have to face some serious issues in the printing process. Use your inkjet printer at least once or twice a week, so there is no danger of dried ink in the printer. Through these simple maintenance techniques, you can make your printer perform better and long lasting.