If you are a Mac OSX user, chances are that, you might come across external hard drives and flash drives formatted in NTFS which are given/lent to you by Windows users or you might have a Windows NTFS drive in a bootcamp partition. It might be a pain to not have write support to NTFS drives, but then, there’s a ways to get past it. Most people recommend using a third party driver like Paragon NTFS, Tuxera NTFS or ntfs-fuse. However, there is a less known option that one can use as well.
OSX’s default NTFS driver has the option to write to NTFS drives. However, for some reason, it has been disabled by default. The process to enable it is fairly technical and is not supported by Apple. OSX users are generally encouraged to use FAT32 or exFAT file systems for sharing files with Windows. The lack of official support may mean that if anything goes wrong, you are on your own. So it is always recommended to back up all important data before trying this.
If you are aware of the risks and comfortable with the consequences, lets move on with the process. The method requires usage of the command-line (Terminal), and must be done on a per-drive basis. The methods here have been tested and confirmed to be working on Mac OSX 10.10 (Yosemite) and 10.9 (Mavericks).
Method 1: Manually appending/editing the /etc/fstab file
Before we proceed with the details, let me explain how this method works.
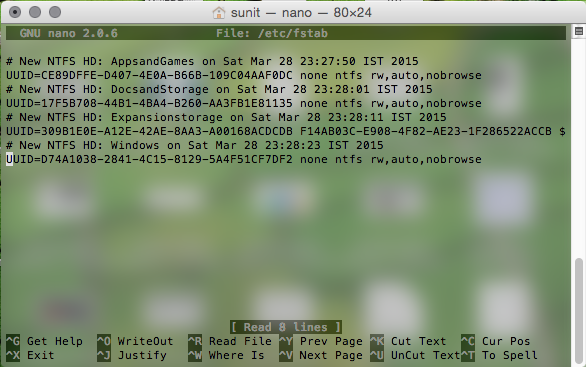
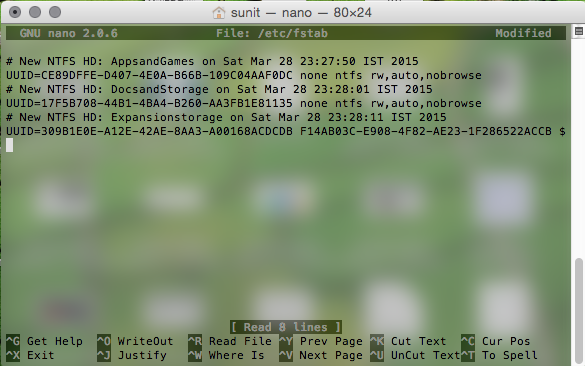
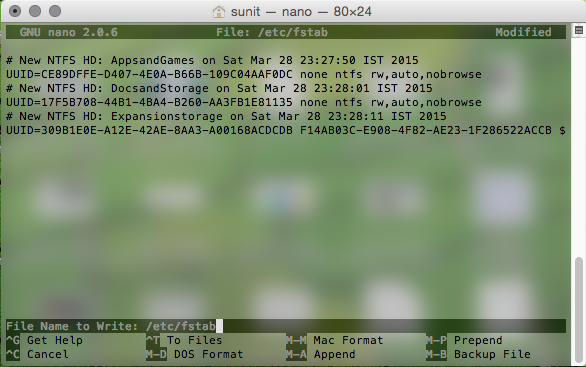
The fstab is a file system table that is usually located in
/etc/fstab
in Unix-based based systems. The fstab stores configuration about what drives/partitions should be mounted where and how when your computer boots up, along with tweaks and other initialization options. In this method, we’ll essentially add entries to the fstab so an NTFS drive will always be mounted in read-write mode.
Enable write support using drive UUID
This is the most accurate way to get your job done and prevents a lot of ambiguities when dealing with drives.
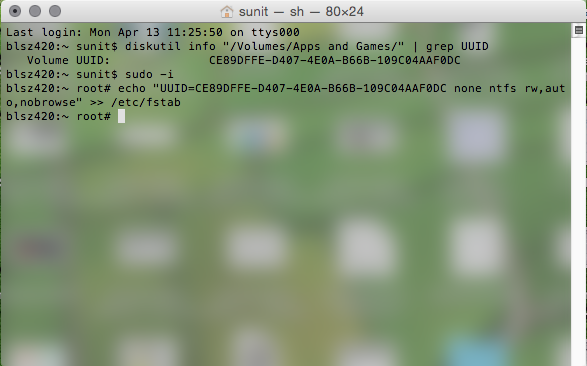
Make sure your NTFS drive is connected to the Mac. Open up a terminal window and type:
diskutil info /Volumes/DRIVENAME | grep UUID
where DRIVENAME is your drive’s name to retrieve the UUID of the drive.
with the resulting UUID that shows up, type the following:
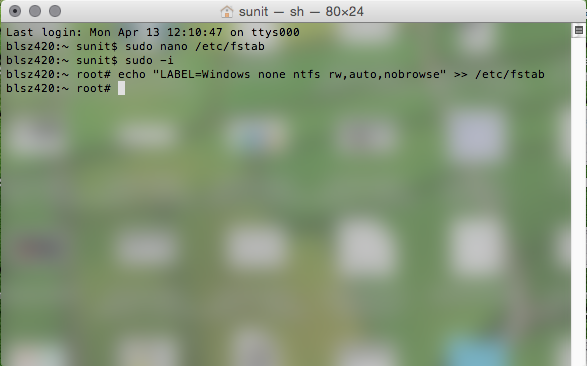
sudo -i
Enter your password and hit enter if asked.
Then type:
echo “UUID=ENTER_UUID_HERE none ntfs rw,auto,nobrowse” >> /etc/fstab
to append the UUID with NTFS read and write support to /etc/fstab.
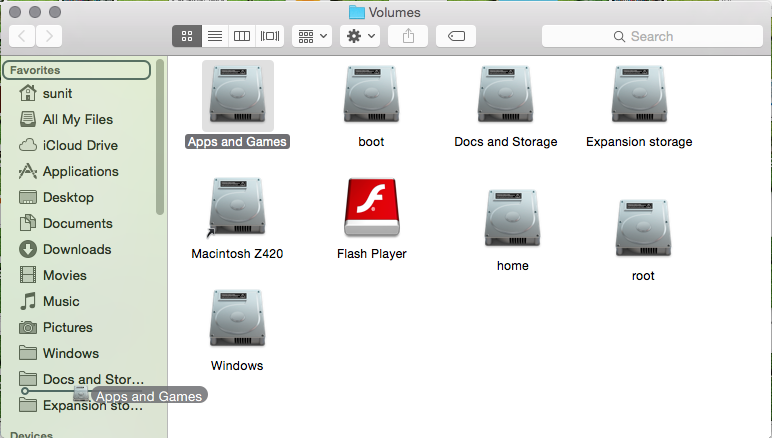
Once you do that, write support will be enabled for that drive. However, it will not show up in the Finder or Desktop when you connect the drive. You can open up the Volumes directory by typing in the terminal:
open /Volumes
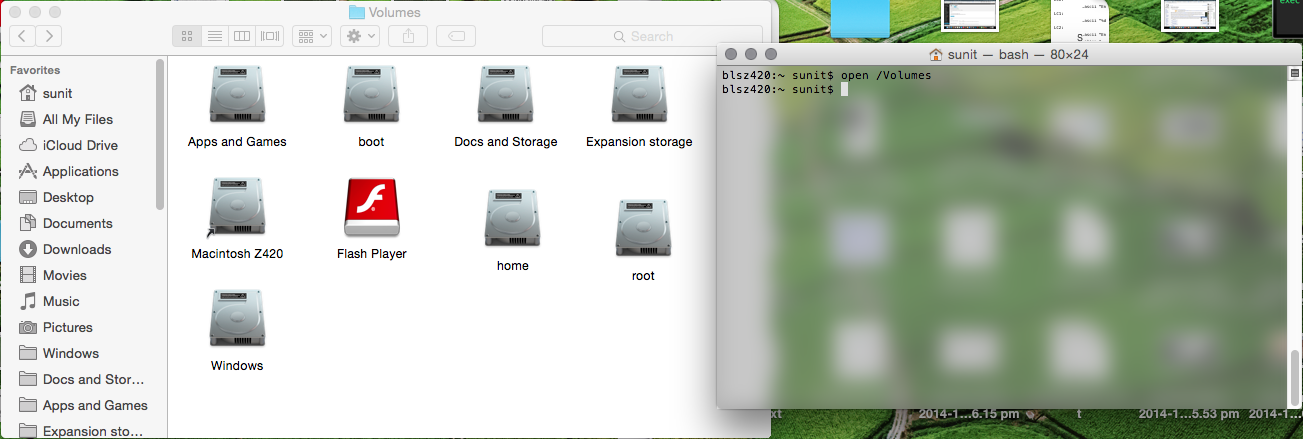
After that you can drag your drive and to add it to the Finder pane to permanently place it in the left shortcuts pane under “Favourites” for easier access. Note that you won’t be able to place it in the “Devices” section once write support is enabled.
Enable write support using drive label
There is an alternative easier method to give write access to an NTFS drive using the drive label. This eases up a lot of extra effort, but there are certain caveats, such as:
- Drive labels having special characters and spaces cannot be used.
- Two drives with the same labels can conflict.
If you have any of the above issues, I’d suggest you to try the UUID option.
However, if that isn’t your case, you can try this out by typing the following command in the terminal:
sudo -i
echo "LABEL=DRIVE_NAME none ntfs rw,auto,nobrowse" >> /etc/fstab
For example, adding read/write support to a drive named “Windows” will look like this:
sudo -i
echo "LABEL=Windows none ntfs rw,auto,nobrowse" >> /etc/fstab
Enter your password and hit enter if asked.
Once you do that, write support will be enabled for that drive. Yet again, it will not show up in the Finder or Desktop when you connect the drive. You can open up the Volumes directory by typing in the terminal:
open /Volumes
After that you can drag your drive and to add it to the Finder pane to permanently place it in the left shortcuts pane under “Favourites” for easier access. Note that you won’t be able to place it in the “Devices” section once write support is enabled.
Method 2: Using a shell script to handle your drives
There is a wonderful little shell script written by Alexander Tsirel and is published on GitHub with the name NativeNTFS-OSX. This shell script pretty much automates enabling NTFS read-write mode by fetching the UUID and adding it to the fstab. It also, to some extent, prevents duplicate entries in the fstab.
You can get the script by typing the following in the terminal:
curl -LO https://raw.githubusercontent.com/noma4i/NativeNTFS-OSX/master/ntfs.sh
Then, the script needs to be made executable by:
chmod +x ntfs.sh
After that, all one needs to do is run the script as root:
sudo ./ntfs.sh
Enter your password and hit enter if asked.

You can then follow the onscreen instructions to enable read and write access on a drive. After that, every time you attach a new NTFS drive, you need to run the script once for that particular drive.
Once read and write access is enabled, it will not show up in the Finder or Desktop when you connect the drive. You can open up the Volumes directory by typing in the terminal:
open /Volumes
After that you can drag your drive and to add it to the Finder pane to permanently place it in the left shortcuts pane under “Favourites” for easier access. Note that you won’t be able to place it in the “Devices” section once write support is enabled.
Undoing the changes you’ve made and going back to read-only NTFS
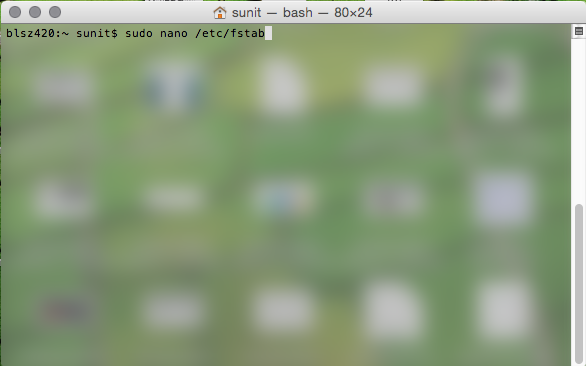
If you ever run into problems, like the drive not showing up or are errors trying to access it, you need not worry as the process is reversible. All you need to do is open the /etc/fstab file using the nano text editor:
sudo nano /etc/fstab
Using the arrow keys, navigate to the line that best describes the faulty drive entry (you will notice it by the label or UUID), and use Ctrl+K to cut it. After that, also do the same for the other problematic entries.
Once done, use Ctrl+O to save the file. The editor will ask for filename confirmation. Just hit enter to proceed and then Ctrl+X to exit the editor.
After that, you need to reboot the computer, and the drives that you removed from
/etc/fstab
will appear as read-only again.
Conclusion
The above steps will grant you full fledged write access to NTFS in OSX.
However, do keep in mind that this method is not very well supported. NTFS drives with errors or inconsistencies will not work well. In such a case, one can attach the drive in Windows, run a check and repair, and attach it back to OSX again.
Thanks a lot for reading, and I sincerely hope this guide works for you. If you have any feedback, please feel free to leave them as comments below. If you have any queries or doubts, please open a discussion on our forum or Facebook group and I and my friends in our community will assist you.
Have a great day!

11 Comments
awful
13 April, 2015yeah it worked out decent for like an hour so and it disappeared,sure the disk appeared but appeared as empty,my files were still there.then i connected to the windows and it said it was corrupted and need to format it.went through internet and found how to recover using cmd in windows,and it worked but took hours.after tht plugged it in after couple of hours of using it happened again.now im again recovering files using cmd on windows.
thanks but this function is definitely not worth it to having activated it.its gonna corrupt and crash ur ntfs external hard disk almost always.
Sunit Nandi
13 April, 2015I’m really very sorry that it doesn’t work for you. But the method I’ve mentioned so far works perfectly in my Mac. I am running OSX 10.10.3.
awful
13 April, 2015its cool brah,it didnt work out on mine and at least u put info on how to reverse it.
Vaidyanathan S
13 April, 2015I had the absolute same problem ! Would advise folks to recheck their drives even if it seems to be writable. I used a WD 1 TB HDD.
Geetanjali
13 April, 2015I tried with the same steps (both method 1 and 2), but then I am unable to see the disc on my Finder application or anywhere. Even in terminal open /Volumes doesn’t show the disc. I have to undo all the changes and restart for the disc to mount again, but back as read only which brings me back to Square 1. I wonder what’s going wrong!
Sunit Nandi
13 April, 2015Well, this method is not widely supported. It *may* or *may not* work. Remember to test the drive in Windows before attaching it to OSX.
Geetanjali
13 April, 2015Yes, works fine in Windows. Sigh.
[email protected]
13 April, 2015Method 1 worked like a charm for me (Lion), I had to restart my computer first, before opening the volumes with the terminal. Thanks!!
Sokhoen Sor
13 April, 2015The first method works well with El capitain. However you have to reboot your machine.
Thanks
Nischal
13 April, 2015I cannot view my external hard drive after i followed method 1
Even in terminal when i hit open /Volumes , it doesn’t show my hard disk. The hard disk does actually appear on the disk utility application though. What can I do to access the external hard drive?
Thank you for your great help!!
Sunit Nandi
13 April, 2015Try mounting the drive using disk utility. Right click the drive and then click mount.