“PHOTOGRAPHY: AN ART THAT NEVER FAILS TO AMAZE US”
One would think that the art of photography is a relatively new concept—it’s not. The history of photography actually goes way back around 1717 when Johann Heinrich Schulze, a professor and polymath from Germany when he captured cut-out letters on a bottle. The crazy thing about it is, he did not actually take a step ahead and make it durable. The first-ever attempt in making at capturing images, though unsuccessful was made by Thomas Wedgewood in 1800. Over the years and a couple of improvements later, it transformed into the amazing thing that it is today. Who would have thought that photos, the same thing that we’d upload on Instagram in a matter of minutes, was first captured on a bottle? Crazy, right?
The Importance of Capturing Photos and Keeping Them
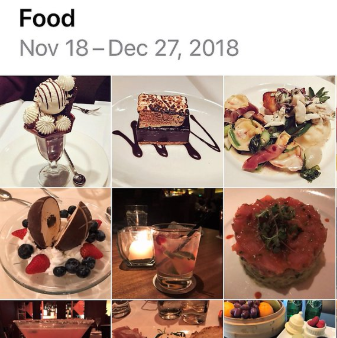
If ‘photos’ were actors and actresses, they’d be winning Oscar’s every year for being so versatile. One minute, you’d take one to capture your girls’ night out moments or taking a series of photos of the class whiteboard just so you’d never read them again, to taking one for evidence (just so you could prove to Jenny that her boyfriend REALLY is out with his friends, and not studying in the library for his SATs). The point is: we need them, and we can’t deny that.
For no matter what the purpose, it’s completely understandable that you would want copies of them in every device you have. It’s also understandable that you don’t know how to transfer them or if you’re just looking for ways to transfer them without the hassle. Do not freak out, we’re here to help. In this article, we’ll talk about the ways of transferring photos from your Android device to your PC.
Before we have an in-depth discussion about the ways of photo transferring, it’s good to know that an Android device opens more ways of transferring.
Fonedog Phone (Photo) Transfer
If you’ve read my previous article, then you wouldn’t be so surprised that I’m raving about this app. Don’t worry though, I’m not here to do sales talk and make you download the app, you decide that yourself. But after reading these steps, how could you resist?
WHAT YOU NEED:
- FoneDog Phone Transfer
- USB Cable
STEPS TO FOLLOW:
1. If you don’t already have the app, you can download the app on www.fonedog.com. If you want to try it out first before subscribing to a package, a free trial is still available.
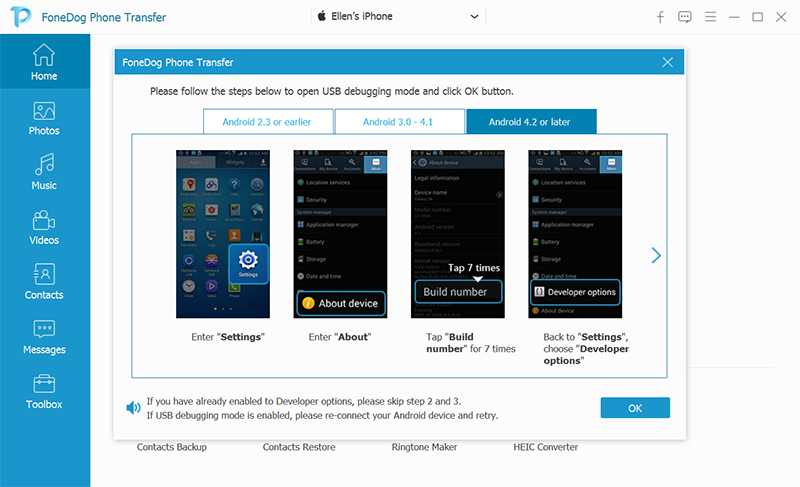
2. Once you’ve plugged in your phone to the computer via USB cable, you’d undergo a USB debugging. There might be slight differences in the debugging process for devices with Android 2.3 or later, Android 3.0-4.1, and Android 4.2 or later.
· For Android 2.3 or earlier:
- Enter ‘Settings’
- Enter ‘Applications’
- Choose ‘Development’
- Click USB Debugging
· For Android 3.0-4.1:
- Enter “Settings”
- Choose “Developer Options”
- Click USB Debugging
· For Android 4.2 or later:
- Enter “Settings”
- Enter “About Device”
- Tap “Build Number” 7 times
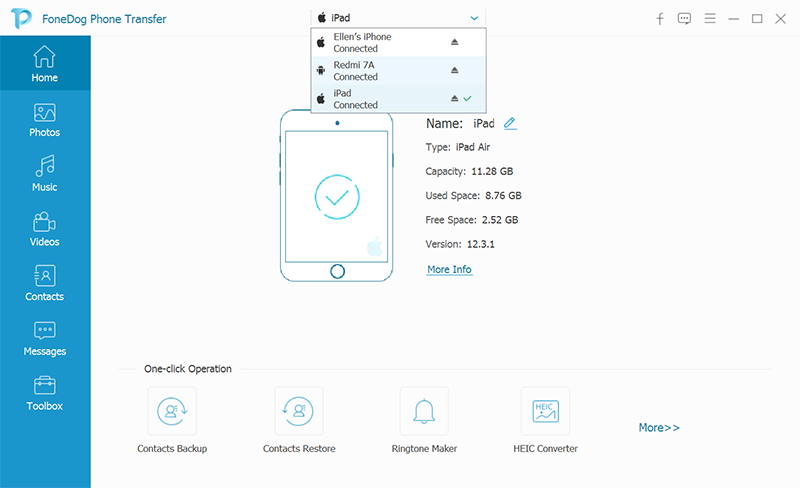
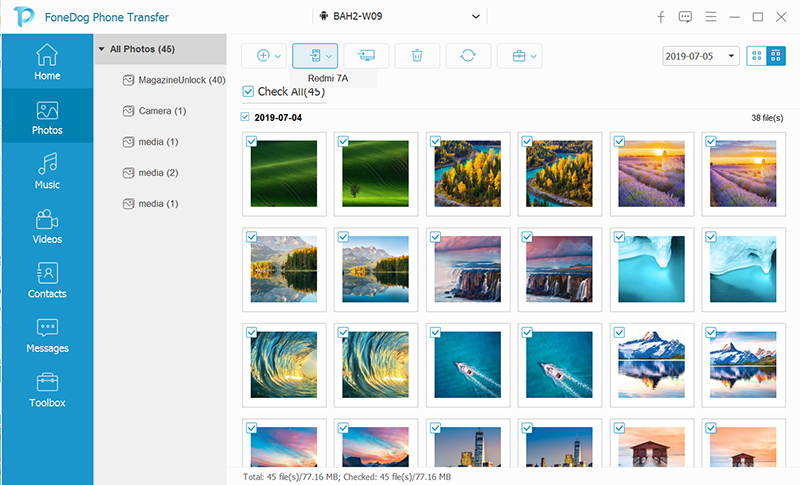
3. You will then be redirected to the app itself. Go to the left side of the screen and click the second icon. You’ll see all the albums on your phone.
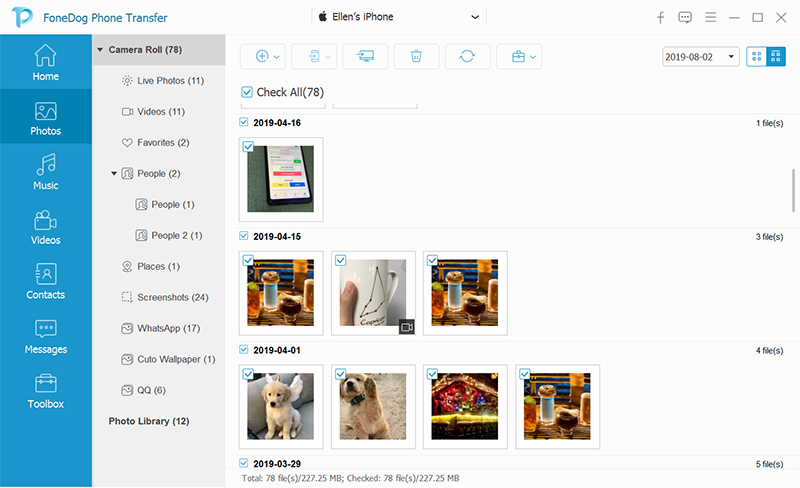
4. Choose the photos you want to transfer. Details about the file name and size are provided for you to distinguish one photo from the other.
5. Transfer the photos from your Android to PC by clicking the device you want to transfer to or the “Export to PC” button right above photos. Do not worry about transferring too many photos to your computer, available space will be calculated by the app as soon as the transfer begins.
6. Wait for the process to complete, and you’re done.
So easy, right?
TIP: Having second thoughts about converting a HEIC image to a JPEG image? You can convert it via Phone Transfer without any quality loss! Talk about #photogoals!
Google Drive Transfer
Another way of transferring photos from your Android to PC is via Google Drive Transfer. As per the Google Photos Help page, you might want to have a couple of things before you get started:
· Good internet connection.
· File sizes that smaller than 256 x 256 and larger than 75 MB or 100MP
· Photos: .jpg, .png, .webp and some RAW files.
· Videos: .mpg, .mod, .mmv, .tod, .wmv, .asf, .avi, .divx, .mov, .m4v, .3gp, .3g2, .mp4, .m2t, .m2ts, .mts, and .mkv files.
Via Back-up and Sync:
1. Download and install Back-up and Sync on your computer
2. Sign in to your Google Account
3. Go to Google photos
4. Select the photos you want to be backed-up
5. Choose your upload size: express back-up, low quality, and high quality
6. Click start
The next time you want to transfer files, just go to Back-up and Sync on your computer and click “Preferences” and begin your upload.
- Uploading Photos from your Google App:
- Open your browser and go to photos.google.com.
- At the top right, click Upload and then Computer.
- Find and select your photos and click open.
Note: You can also drag photos from your computer to the album to upload them to Google Photos. If you drag a photo to a specific album, the photo will be uploaded to that album.
Photo Transfer With USB Transfer
One of the oldest tricks in the book of photo transfer is via USB. This step requires you to connect your Android device to your PC via USB cable. When plugged in, open the notification on your phone and switch the use for USB for File Transfer. Once a file transfer window will open on your computer, use it to manually transfer files via dragging. Once the transfer is complete, be sure to eject your device from Windows before unplugging.
How Do We Weigh The Ways?
Sure, there are multiple ways to transfer photos, but not all of them are the best option. You probably already decided, but before you do anything—hear me out. When faced with many options, I always try to make criteria in my head. The ideal app should be something that I’m familiar with, fast and most of all, convenient.
The most familiar way would have to be manually transferring files from phone to PC via USB cable. I mean, I can’t blame you. Why in the world would you try and learn something new when the current option still works? That’s what I thought so too until I realized that manually transferring photos would not only require me to do it manually, it would take so much time that you’d actually regret not learning anything new in the first place.
I mean, cavemen should have stopped looking for other ways to cook food the minute they discovered food, but they didn’t. That’s right, our desire to make things easier gave us stoves people! Kidding aside, there’s nothing wrong with learning new stuff, especially when it benefits you.
The second criterion would have to be speed or how fast you transfer things. Google Transfer is one of these options. You don’t have to connect your devices. Just one log-in and you’re there. Here’s the thing though, Google Transfer has limited storage and often requires a strong internet connection. What do you do when the photos you have to exceed the space limit and you don’t have an internet connection? What do you do then? One should always be looking at the big picture, especially when making decisions.
The third criterion would have to be the convenience, which for me is about familiarity, speed, and has the overall package. FoneDog Phone Transfer is the option for me and here’s why:
- FoneDog might have some extra steps, but the nature of the transfer is familiar so it wouldn’t be hard to learn and understand.
- Not only that, FoneDog Phone Transfer has the speed that the normal USB transfer does not. It has the speed and familiarity, which is a good plus!
- FoneDog does not have a space limit since it only plays as the middle man in the transfer. Meaning, you can transfer to your heart’s content, online or offline!
Now that I’ve listed the ways, steps, pros, and cons, you can make the decision for yourself. The choice ultimately lies in your hands. What I only give are the facts.
If you’re fine and comfortable, continue the same way of transferring. No one would judge you, and no one has to know. However, if you’re sick and tired of the usual way and you do not want to miss your shot at a great app, then FoneDog is for you.
What are you still doing here? Stop listening to me babble about this app and try it for yourself. You can start a free trial and choose the package you pay for! Did I mention that the packages range from 1 to 5 devices, all complete with lifetime packages? Get one while it’s still 30% off!
Get a copy of those memories the best way you can!