You have an app idea, but you don’t know where do you get started? Before all else, you should consider whether you need to learn how to code yourself. Learning a new skill like programming, especially if you haven’t got any experience before, is quite daunting. But it’s quite possible and can be fun. However, it’s not like you can spend a couple of hours a week and then expect to pick it up in a month. It requires some serious dedication just as if you are learning a new language. The first thing you should consider is how much time you have and how much is your time worth to you. It could be better for you to pay someone to create a program for you. In this case, you should think over your budget and cost of managing a freelancer. Although, if you decide to study, there are various resources to learn online and many of them are free. Apple themselves provides the tool Xcode, which you can download for free. That is the official Apple tool to build your iPhone App.

Once you have thought it through, you can move to the information below. So, how can you take it from an idea to a reality?
Step 1. Write your idea
Before doing anything, take some notes. Write whatever comes to your mind, every single idea. Then answer some of the next questions. What your app is going to do? Will it be static, or have a new content added on a regular basis? What features will it use? A camera, GPS or other hardware? And again, one of the most important question to ask is what the budget is?

Step 2. Research your idea
Does it already exist? Who are your competitors? Identify trends and market needs. Remember that you want to make sure that there are no similar apps in the market. But if there are, that doesn’t mean you need to give up on your idea. Competition only shows that there is a market there. You can benefit from the existing apps by improving their offering.
Step 3. Identify the audience
Whom your app will be serving? It is important to identify your potential customers, do a study of your demographic. You need to consider such factors like age, social background, economic status, etc. Knowing your audience helps you to see what else should be fixed or improved.

Step 4. Brand it
Give your idea an easily recognizable name. Your app’s name and design should always be based on your target audience. It’s not about you; it’s about the user. The first impressions are everything, so you should take it seriously. You should have an understanding of your brand before you start to develop. You can even start promoting it before your app officially launches. Plan for the future as you want to build a brand that can last for a long time. Keep it simple and professional.

Step 5. Develop your app
Now it’s time to actually build your program. If the thought of learning how to code seems overwhelming, then you need to find an experienced app developer. Bugs and glitches happen to everyone. Test and improve your program regularly. You can even involve your friends in this process.
However, even those who are not skilled in programming have an opportunity to develop an app yourself with no third party involved. How? Let’s dive into the coding process and divide it into sub-steps so that you’ll see that it’s not that complicated as you might have thought.
- Gather the tools you will use for coding. We are talking about two iOS essentials – Xcode and Swift. Xcode is an integrated development environment that contains plenty of coding appliances installed. You can download the most recent version for free at Mac App Store, as well as get updates and new releases of this program. Swift is a programming language developed and supported by Apple. It is full of original features, as well as intuitive and easy to navigate. After you have installed these two on your computer, you are good to go!
- Your first move towards a future app is to launch Xcode and create a new project. It would look as follows:
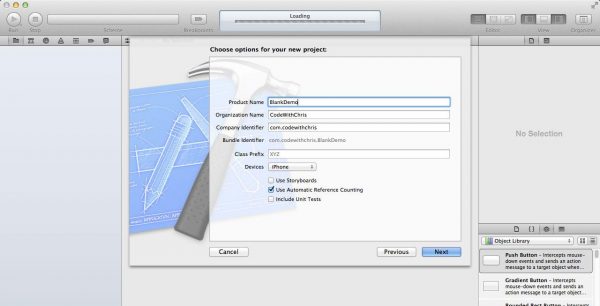
Fill in the needed details and proceed to the next step. - Now, you have to document all the properties of your future application that you should have already thought through. That is why we have stated earlier to plan a program you want to release thoroughly. Check out the screenshot to get a clearer image:
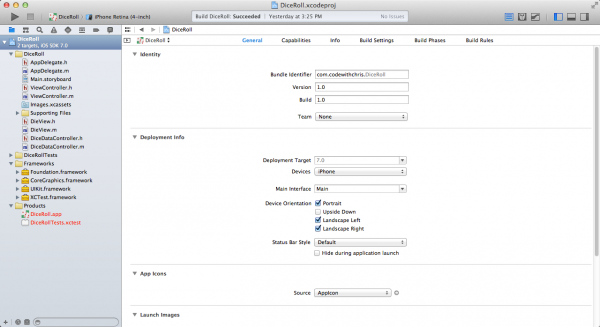
Image source - After having filled in project properties, open the code file (see the left side of a screenshot from above) and write down the code for your future app. That is where Swift language comes into play – this is your tool for all the code lines you are to type.
- We are ready to proceed with probably the most creative part of a project – user interface customization. To do that, open Storyboard file (you can find it on the left side as well).
- Do not forget to track your progress with an Xcode toolbar. Simulator included as well, so you can test a draft of your app from the very beginning of its development to avoid bugs in future.
- The core files you should pay attention to are View and ViewController files (find them below Storyboard one). What you are going to include there will define how users will interact with an app and what will they see. Functionality of these documents is hidden in their names – View is exactly what user sees, ViewController – file, where a developer modifies the View.


All that is left – is to fill your app with content and you are ready to release your product!
Step 6. Fill in your application with high-quality content
Although when getting to coding it seems that technical part of a project is most complicated one, lots of developers (especially self-employed ones) change their opinion when it’s time to copy write for an app. This step requires not only English literacy, but creativity, and thorough examination of your target audience. Here are a few aspects to consider when creating text for your program:
- Brand identity is what will differentiate your app from thousands of other available in App Store. This term covers not only technical features and web design, but logo, headings, instructions, fonts, etc. Think it through and involve a third party for consultation, as the more opinions you’ll take into consideration, the better for an end result.
- Work not only on the name of your future application but on a catchy tagline as well. Attention-dragging slogan is crucial since you would never manage to include mission and vision of your app into its name solely. What stands behind this name should be reflected in a tagline, so think it through or hire an accomplished copywriter to help you.
- Do not overload program’s layout with wordy sentences and sophisticated phrases. Content has to be an easy-to-read getting each word to the point.
- Do not underestimate proofreading and editing steps. It’s totally fine if you decided to write by yourself without reaching for cheap assignment writing service in uk. But do not rush to upload freshly written texts directly to the app. Checking it for typos, mistakes, and inaccuracies is crucial since no user would take a program seriously seeing mistakes on its pages.

Image source
Step 7. Start marketing your product
After having the readily made mobile app at your disposal, it is high time to think about marketing and search engine optimization (SEO) techniques. We have no doubts that your program is a great software valuable for users, but unfortunately, there are already tons of other good applications. So why should users choose your app out of all the others? How can they benefit from downloading it? Which ways are better for client attraction and lead generation? Answers to these questions will define your marketing strategy. If taken seriously, wise development of your product will add to popularity of your startup. A sky is a limit in the matter of app marketing.

The next set of steps would focus on ensuring the continuity of the application you created.
Step 8: Get in touch with investors
In the process of marketing your application, it would be a good idea to seek out people of like minds who will be willing to invest in what you created. Getting like-minded investors aboard helps you get more options in choosing the best marketing strategy to convince potential customers on the value of your application. It also takes a lot of pitching, but it’s worth it in the end.
Step 9: Getting a wider reach
Now that you’ve got a few investors aboard, there is the need to constantly stay in touch with target audience by expanding your reach, preferably beyond your location. Accessibility is an important factor people consider when using an app. Making your app accessible would boost its ratings and give people more reason to try it out.
Step 10: Making your software audience-friendly
What do we mean by audience friendly? You are marketing a seller app, for example, one that allows you to buy and sell different commodities. Something that somehow resembles eBay. You need to make your app audience-friendly such that it ‘bends’ towards their standards. This could include the addition of other languages, making the commission minimum low, making it difficult for scam sellers to register, etc.
Step 11: Re-evaluation
You have been making slight changes to your application for a while. You have a respectable following of customers who use your application. At this point, it does you some good to take one step back and listen to the feedback. Feedback is very important as it allows you to identify glitches that were barely noticeable. By listening to your users, you would know what needs to be tweaked or removed from the software.
Step 12: Making your app OS-friendly
Yes, we know it’s an iPhone application, but what if there were countless possibilities? How effective would the purpose of the app be met when it’s made available for Android users? Or Mac OS or Windows OS? There are opportunities that can be tapped into when you make your app available on other platforms besides iOS.
Step 13: Enhancing flexibility
Device layout, compatibility with different smartphones and their features (e.g., does the app support split-screen features? Can it be navigated through either on mobile or tablet mode?) are all essential to the proper functioning of your app. Ensure you make your app adaptable enough for people to use.
Step 14: Partnering with other app developers

Your app is budding and blossoming. At this point, there might be other developers who would consider partnering with you through different ways like offers, reward programs, and promotions. Choose your partners wisely and use available deals to solidify your follower base and secure even ambassador spots for bigger corporations.
Step 15: Further improvement
Software gets updated every day. Be on the lookout for new updates that would enhance the smooth running of your app. Stay in constant touch with your customers and shareholders. Be open to corrections and suggestions. And keep your program accessible even if you would need to create premium and deluxe packages for users to subscribe and enjoy advanced features.