While it is easy to mistake WordPress.com and WordPress.org for the same thing, there are important differences. The main one is that with WordPress.org the hosting is up to you – it can be anywhere you have web space. This is important because in choosing your own web hosting space, you can decide on the exact features you want it to have to suit your website.
Unfortunately, some people may not have realized the difference and ended up with WordPress.com sites. Not to worry though, it really is not that difficult to migrate your website from WordPress.com to WordPress.org.
Even if you haven’t decided to move yet, I do recommend it because ultimately WordPress.org offers much more flexibility in managing your own website and fewer restrictions.
Preparing for the Move
Since WordPress.org sites require you to have your own web hosting space and domain name, you need to make sure that these items are ready before you move. Choosing the right web hosting for features like reliability, uptime, site backup and etc. can affect your website more than you think, so spend some time looking around.
Nowadays, there are many web hosts that have domain names bundled into some web hosting packages. I recommend not worrying about this too much as there are many places like NameCheap where you can pick up a cheap domain name, at least for the first year.
Steps to Migrate from WordPress.com to WordPress.org
Once you have the above two (web hosting and domain) in hand, it is time to move on to the migration process. This works in just a few key steps.
Step 1: Exporting Your Existing Website
In your WordPress.com account you may have more than one site. Click on the arrow to the right of the website you want to export. And you’ll go to a dashboard of that site. On the left sidebar scroll to the bottom of all those options and click on ‘Settings’.

On the next page, click ‘Export All’. How long you have to wait for this process to complete depends on the contents of your website. The more contents you have, the longer it will take. Once complete you will be shown a message stating that the export was completed.
On that message there will be an option to download the file. Click on that and save the file somewhere on your computer that you will remember for later.
*Note: The export process only exports the contents of your blog – the posts and pages. It will not export widgets, settings or anything else – those will have to be set up manually later.
If you also have subscribers on your WordPress.com site there are extra steps that you’ll need to do here. You need to make use of a plugin called JetPack that will help with subscriber migration. Once you’ve installed that, you must contact the WordPress.com support team and ask that they assist in subscriber migration.
Step 2: Installing WordPress on Your New Host
Unless you have bought managed WordPress hosting, it is likely that you will need to set up WordPress on your own. This isn’t difficult though. Almost all control panels on web hosts will have installers which you can use to set up web applications like WordPress.
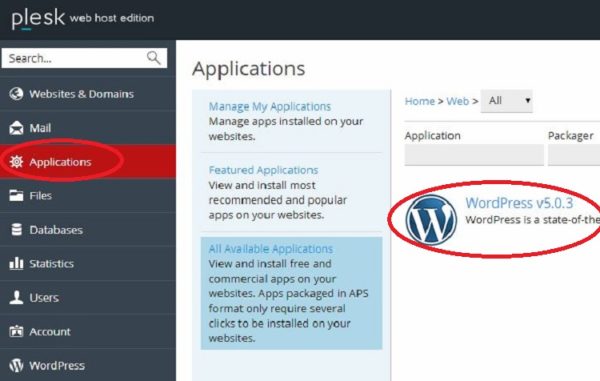 Caption: This is what the option looks like inside the Plesk Control panel
Just search for the option and click on it, then follow instructions to set up a default WordPress installation. If you get really lost, get in touch with your web host customer service. Some of the may be nice enough to assist you with the installation process.
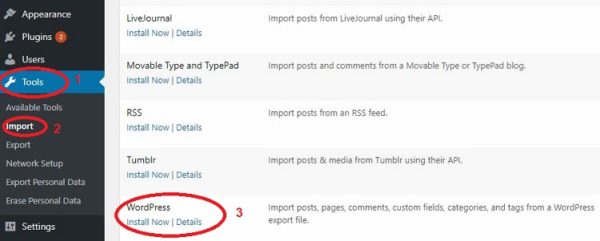
Step 3: Import Your Original Site Contents
Once the installation is done, log in to your new WordPress account on the new web host. One the left-hand sidebar, click on ‘Tools’ then ‘Import’. You will see a list of options as to what kind of locations you can import your content from. Click ‘Install Now’ at the WordPress option.
This process helps you install the WordPress importer tool. Once you’ve done that, click ‘Run the Importer’ and the select the file you wish to import. This will be the file you saved earlier on your computer.
After that is done, you need to decide who you want to assign the original posts to as the author. Unless you’ve already set up a few different user accounts, just leave it as yourself.
*Important: There is an option to download and import file attachments. Make sure this is checked unless you don’t wish to import your images or other multimedia files!
When you have completed all the steps above, just hit the ‘Submit’ button.
Completing the Setup
Although this technically completes the migration process, there are a couple more details which you need to attend to before you’re back in business. The first order of business is putting your new home in order. You’ve moved all the stuff from your old site here, but it still needs to be decorated nicely to feel like home.
The first is to ensure that your content was moved over correctly. This may take a little time as you go through them to ensure that they are there and that there are no issues in formatting or otherwise.
That being done, you also need to start decorating. A new theme will have to be chosen and set up to your liking, since the migration process does not include that. You will also need to install and configure any plugins you may have been using and feel that you need to continue on with.
Preserving Your SEO and Using Redirection
One of the top concerns many users have when thinking about migrating their websites is SEO. After all, both your users and search engines like Google may already be used to your previous URL right? No worries, a standard practice to help with this is by using 301 redirects. 301 redirects help you maintain your search engine rankings during site migrations.
There is a catch though. While normally we can manage redirects with access to the .htaccess file, this isn’t permitted on WordPress.com. That’s why they can offer the redirect feature as a chargeable extra.
For a fee of $13 per year, WordPress.com will send all the traffic that is being directed to your old site right to the new location.
For personal blogs this may not be worth the price to pay (depending on how much time and effort you have expended in your site) but if you’re moving because of a business expansion, it is a very small price to pay.
Conclusion
As you see, the entire migration process is not overly difficult, but can be quite time-consuming. Especially in the setup and re-decoration of your new site. Yet I encourage you to think of it as housekeeping and upgrading the infrastructure to better serve your readers.
If you feel that the process may be a little too complex for you, there is still hope. Remember the part earlier where I mentioned that you need to shop around for a web host that suits you? Some web hosting service providers offer to help you migrate your websites free of charge! Make sure you look out for this option if indeed that is what you want.
If they aren’t offering it for free and you buy their hosting, getting them to manage the migration may end up costing your hundreds of dollars.
Author Bio:
Jason Chow is a digital marketer and WordPress fan. He likes to connect with startups and bloggers. He believes reading and practicing what we read is important. You can connect with him via Twitter.