Introduction
There are a lot of sysadmins and dedicated server owners and leasees who use Promox VE as their virtualization manager. There are a lots of great things that can said about Proxmox’s feature-set: it is pretty much complete, with support for various cluster types, distributed storage, failover, networking and fine-grained user management. But one thing would take an important mention over other similar products: it is based on Debian, which makes it very easy to extend its features just by having a working knowledge of Linux. Today, in this blog post, I will be explaining how to configure scheduled offsite backups for containers (CT) and virtual machines (VM) running on a Proxmox VE host to HubiC cloud storage so that all your data and applications stay safe. Even if your server faces data corruption or you lose access to your datacentre or dedicated server host for some reason, offsite backups help you get back up on on your feet quickly and back into business. One should never ignore the importance of backups. Also, regular offsite backups do not need to be complex or expensive. Read on to know more.
Prequisites
First of all, you need root access to Proxmox VE host running containers and VMs. As of writing this guide, the latest version is 5.1. So, in this guide, we will perform the steps on a server running Promox VE 5.1.
Second, you need an account at an online storage service. In this guide, I will use HubiC, an offering by OVH. HubiC isn’t a very fancy product. It offers an API and a basic web interface to upload and download files and is a lot behind industry offerings like Dropbox, Google Drive or Backblaze B2. However, you get 10 TB of storage for a measly price of €5 a month, which allows you to backup not just planets but also the entire solar system 😛 . And that too several times over. Since managing backups doesn’t require fancy features, HubiC does the job just fine. If you purchase the annual plan, it is even cheaper at €50 a year. This makes HubiC a better offsite backup plan for Proxmox VE than using the hosting provider’s offering or more expensive solutions like Idera as HubiC paid plan has the same redundancy and replication as the managed servers in OVH datacentres.
Third, while doing this, you must be on a computer running a variant of Linux. Any distro will work.
Fourth, you need rclone, a tool written in Go to backup and sync to online storages, to be installed on both the Proxmox VE host and your local computer. Type the following in a root shell to install rclone on a Linux computer:
wget https://downloads.rclone.org/rclone-current-linux-amd64.zip ## Download rclone
unzip rclone-current-linux-amd64.zip ## Unzip the archive
cd rclone-*-linux-amd64 ## Navigate to unpacked archive folder
cp rclone /usr/local/bin/ ## Copy rclone to executable path
chown root:root /usr/local/bin/rclone ## Set ownership of rclone to root
chmod 755 /usr/local/bin/rclone ## Set proper permissions to executable
mkdir -p /usr/local/share/man/man1 ## Create manpage directory
cp rclone.1 /usr/local/share/man/man1/ ## Copy manpage to man directory
mandb ## Update manpage database
Now that we have everything we need, let’s move on to setting up the backups.
Connecting rclone to HubiC
Before we can actually back up anything offsite, we need to connect rclone to the cloud storage. To do that, connect via SSH to the Proxmox VE host and type the following after switching to root user:
cd /root ## Change working directory to the home dir of root user
touch .rclone.conf ## Create rclone config file
rclone --config /root/.rclone.conf config ## Set up rclone
You will see something like this:
root@luminous:~# rclone --config .rclone.conf config
No remotes found - make a new one
n) New remote
s) Set configuration password
q) Quit config
n/s/q>
Type ‘n’ and press Enter to add a new remote to rclone. You will be prompted to give the remote drive a name. We’ll name it ‘hubic’ in this guide. You can name it to anything you wish. You will see something like this:
No remotes found - make a new one
n) New remote
s) Set configuration password
q) Quit config
n/s/q> n
name> hubic
Type of storage to configure.
Choose a number from below, or type in your own value
 1 / Amazon Drive
   \ "amazon cloud drive"
 2 / Amazon S3 (also Dreamhost, Ceph, Minio)
   \ "s3"
 3 / Backblaze B2
   \ "b2"
 4 / Box
   \ "box"
 5 / Dropbox
   \ "dropbox"
 6 / Encrypt/Decrypt a remote
   \ "crypt"
 7 / FTP Connection
   \ "ftp"
 8 / Google Cloud Storage (this is not Google Drive)
   \ "google cloud storage"
 9 / Google Drive
   \ "drive"
10 / Hubic
   \ "hubic"
11 / Local Disk
   \ "local"
12 / Microsoft Azure Blob Storage
   \ "azureblob"
13 / Microsoft OneDrive
   \ "onedrive"
14 / Openstack Swift (Rackspace Cloud Files, Memset Memstore, OVH)
   \ "swift"
15 / QingClound Object Storage
   \ "qingstor"
16 / SSH/SFTP Connection
   \ "sftp"
17 / Yandex Disk
   \ "yandex"
18 / http Connection
   \ "http"
Storage>
You can see that rclone supports a large number of remote storages. Since we are setting up HubiC in this guide, type ‘hubic’ in the ‘Storage>’ prompt. A prompt for ‘client_id>’ will appear. Simply press Enter key and let it autogenerate it. You will also see a prompt for ‘client_secret>’. Press Enter on that prompt too. Now you will see the following in the terminal:
Storage> hubic
Hubic Client Id - leave blank normally.
client_id>
Hubic Client Secret - leave blank normally.
client_secret>
Remote config
Use auto config?
 * Say Y if not sure
 * Say N if you are working on a remote or headless machine
y) Yes
n) No
y/n>
Since the Proxmox VE host is a headless machine, i.e., without a graphical environment, type ‘n’ and press Enter. You will see the following instructions now:
For this to work, you will need rclone available on a machine that has a web browser available.
Execute the following on your machine:
        rclone authorize "hubic"
Then paste the result below:
result>
Now, do you remember that I had mentioned in the prequisites that rclone must be installed on the local computer too? It is required for this step. On the local computer, open a shell and type:
rclone authorize "hubic"
You will see the following in the shell window:
[sunit@sunit-ultrabook ~]$ rclone authorize "hubic"
If your browser doesn't open automatically go to the following link: http://127.0.0.1:53682/auth
Log in and authorize rclone for access
Waiting for code...
Also, a browser window will open asking you to provide credentials log in to HubiC. Enter your credentials and click ‘Accept’.

After accepting the permissions, you will be instructed to go back to rclone.
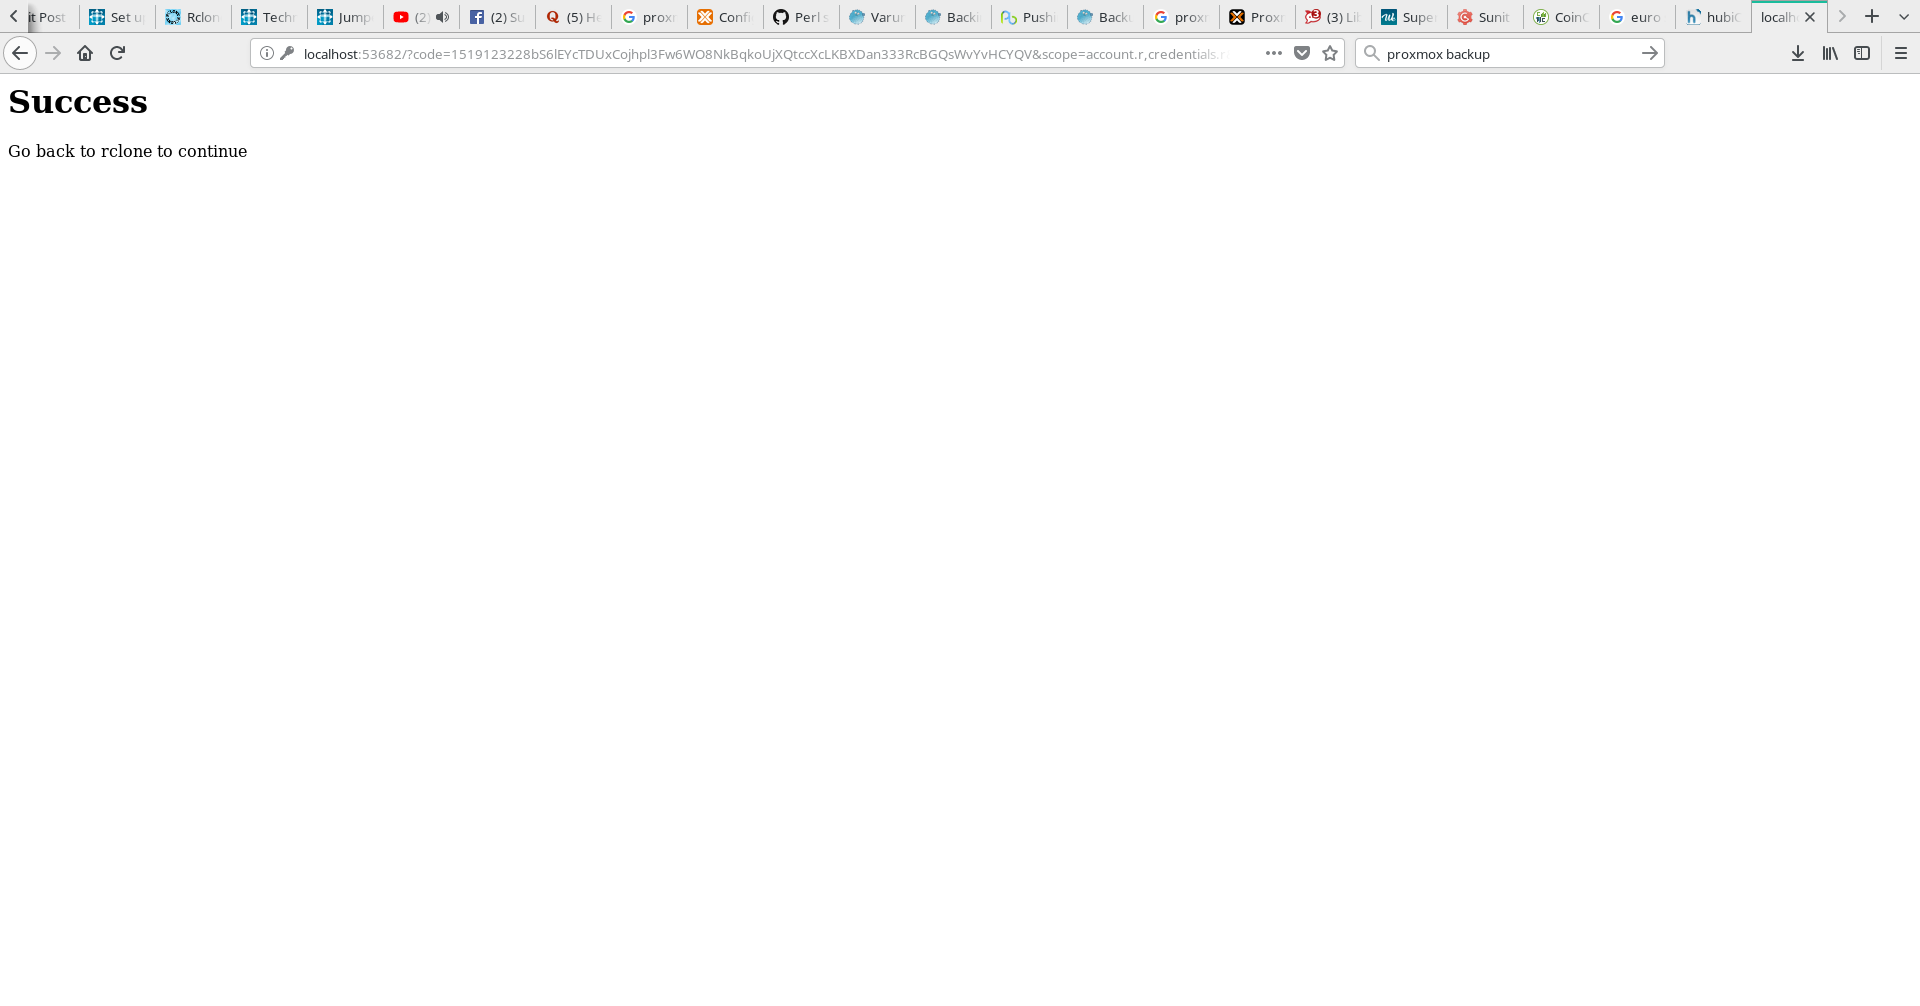
Go back to the shell window. You should see something like this:
[sunit@sunit-ultrabook ~]$ rclone authorize "hubic"
If your browser doesn't open automatically go to the following link: http://127.0.0.1:53682/auth
Log in and authorize rclone for access
Waiting for code...
Got code
Paste the following into your remote machine --->
{"access_token":"P0ZD9BY5t6SHEFJ3y5T8W5Tn1rYXEf6fIKeg0Eo0pFu9OnggE","token_type":"Bearer","refresh_token":"t8ZAdJOhpLFrHAAA7xVVcSUbA8NaQftxtjBA7wD4p","expiry":"2018-02-20T22:10:27.67119432+05:30"}
<---End paste[sunit@sunit-ultrabook ~]$
Copy the JSON data starting from ‘{‘ till ‘}’. Go back to the Proxmox host’s SSH session window. Paste the text there and press Enter. It should look like this now:
Execute the following on your machine:
        rclone authorize "hubic"
Then paste the result below:
result> {"access_token":"P0ZD9BY5t6SHEFJ3y5T8W5Tn1rYXEf6fIKeg0Eo0pFu9OnggE","token_type":"Bearer","refresh_token":"t8ZAdJOhpLFrHAAA7xVVcSUbA8NaQftxtjBA7wD4p","expiry":"2018-02-20T22:10:27.67119432+05:30"}
--------------------
[hubic]
client_id =
client_secret =
token = {"access_token":"P0ZD9BY5t6SHEFJ3y5T8W5Tn1rYXEf6fIKeg0Eo0pFu9OnggE","token_type":"Bearer","refresh_token":"t8ZAdJOhpLFrHAAA7xVVcSUbA8NaQftxtjBA7wD4p","expiry":"2018-02-20T22:10:27.67119432+05:30"}
--------------------
y) Yes this is OK
e) Edit this remote
d) Delete this remote
y/e/d>
Type ‘y’ to accept the remote drive configuration. You will then see this:
Current remotes:

Name                 Type
====                 ====
hubic                hubic

e) Edit existing remote
n) New remote
d) Delete remote
r) Rename remote
c) Copy remote
s) Set configuration password
q) Quit config
e/n/d/r/c/s/q>
Type ‘q’ and press Enter to exit configuration.
Now, we need to test if rclone is working with hubic properly. Before we do that, it is important to say that HubiC is built on top of OpenStack. So the API defines storage locations called “containers”, similar to “buckets” in Amazon S3. Only the container named “default” is accessible by the web interface and mobile app. I don’t know why this is the case, but we will use “default” for everything to prevent any confusion.
Type rclone –config /root/.rclone.conf ls hubic:default to list files in the “default” container. If it lists files as shown below or quietly returns to the prompt, then rclone has been set up properly.
root@luminous:~# rclone --config /root/.rclone.conf ls hubic:default
    86561 Code/IMG-20171029-WA0002.jpg
If it shows shows a credential error, the setup is incorrect or incomplete and you will need to run rclone –config /root/.rclone.conf config , add a new remote and try all the steps again.
Now, we need to see if file transfers work properly. You can transfer any file from the current directory to the “default” container using rclone –config /root/.rclone.conf copy archive.tar.gz hubic:default/ where archive.tar.gz can be replaced with any file or archive of your liking.
Next, you can use rclone –config /root/.rclone.conf ls hubic:default | grep archive.tar.gz to check if your file has been transferred succesfully. If you see something as shown below, then your file transfer was successful.
root@luminous:~# rclone --config /root/.rclone.conf ls hubic:default | grep archive
  9638827 archive.tar.gz
If the prompt returns without showing any output, then either app permissions were not granted properly or there could be a network issue. Try doing the transfer again after half-an-hour to see if it works, else run rclone –config /root/.rclone.conf config again.
Once we can confirm that directory listing and file transfers work, we can move on to the next step.
Hooking rclone to Proxmox VE backup subsystem
To store any Proxmox VE backups, we need a directory in Hubic. We can create one named ‘proxmox’ using by typing:
rclone --config /root/.rclone.conf mkdir hubic:default/proxmox
You can use any other name of your choice.
If you have been running Proxmox VE, you will have noticed that when a backup task is run, vzdump is run to generate snapshots of LXC (CT) and Qemu-KVM (VM) guests. The vzdump utility accepts arguments, which can be specified in the /etc/vzdump.conf file. One of the arguments is a hook script written in Perl.
Before we add the script as an argument we need to create it and save it in the filesystem.
After taking ideas from this script, I wrote the following script to make rclone copy backup files to HubiC after they are generated by vzdump:
#!/usr/bin/perl -w

# VZdump hook script for offsite backups to HubiC

use strict;

print "HOOK: " . join (' ', @ARGV) . "\n";

my $phase = shift;

if ($phase eq 'job-start' ||
        $phase eq 'job-end'  ||
        $phase eq 'job-abort') {

        my $dumpdir = $ENV{DUMPDIR};

        my $storeid = $ENV{STOREID};

        print "HOOK-ENV: dumpdir=$dumpdir;storeid=$storeid\n";

        if ($phase eq 'job-end') {
        # Delete backups older than 3 months (120 days). Change the min-age value to your liking, to decide how long to preserve backups for.
        system ("/usr/local/bin/rclone delete -vv --config /root/.rclone.conf --min-age 120d hubic:default/proxmox/") == 0 ||
                die "Deleting old backups failed";
        }
} elsif ($phase eq 'backup-start' ||
         $phase eq 'backup-end' ||
         $phase eq 'backup-abort' ||
         $phase eq 'log-end' ||
         $phase eq 'pre-stop' ||
         $phase eq 'pre-restart' ||
         $phase eq 'post-restart') {

        my $mode = shift; # stop/suspend/snapshot

        my $vmid = shift;

        my $vmtype = $ENV{VMTYPE}; # lxc/qemu

        my $dumpdir = $ENV{DUMPDIR};

        my $storeid = $ENV{STOREID};

        my $hostname = $ENV{HOSTNAME};

        # tarfile is only available in phase 'backup-end'
        my $tarfile = $ENV{TARFILE};

        # logfile is only available in phase 'log-end'
        my $logfile = $ENV{LOGFILE};

        print "HOOK-ENV: vmtype=$vmtype;dumpdir=$dumpdir;storeid=$storeid;hostname=$hostname;tarfile=$tarfile;logfile=$logfile\n";

        # Copy generated backup tarball file to Hubic cloud storage
        if ($phase eq 'backup-end') {
        system ("/usr/local/bin/rclone copy -v --config /root/.rclone.conf $tarfile hubic:default/proxmox/") == 0 ||
                die "Copying tar file to HubiC failed";
        }

        # Copy generated backup log file to Hubic cloud storage
        if ($phase eq 'log-end') {
                system ("/usr/local/bin/rclone copy -v --config /root/.rclone.conf $logfile hubic:default/proxmox/") == 0 ||
                        die "Copying log file to HubiC failed";
        }

} else {

        die "got unknown phase '$phase'";

}

exit (0);
You can copy the above script, paste it to a text editor and save it in /usr/local/bin/vzdump-backup.pl on the Proxmox VE host. You can adjust the –min-age 120d and hubic:default/proxmox/ to your liking in order to decide for how long to keep backups and the backup location respectively.
Now, open the /etc/vzdump.conf file with a text editor like vi , emacs or nano . If you have never modified the file below, you will see something like this:
# vzdump default settings

#tmpdir: DIR
#dumpdir: DIR
#storage: STORAGE_ID
#mode: snapshot|suspend|stop
#bwlimit: KBPS
#ionice: PRI
#lockwait: MINUTES
#stopwait: MINUTES
#size: MB
#stdexcludes: BOOLEAN
#mailto: ADDRESSLIST
#maxfiles: N
#script: FILENAME
#exclude-path: PATHLIST
#pigz: N:
Add the line script: /usr/local/bin/vzdump-backup.pl to the file, so that it now looks like:
# vzdump default settings

#tmpdir: DIR
#dumpdir: DIR
#storage: STORAGE_ID
#mode: snapshot|suspend|stop
#bwlimit: KBPS
#ionice: PRI
#lockwait: MINUTES
#stopwait: MINUTES
#size: MB
#stdexcludes: BOOLEAN
#mailto: ADDRESSLIST
#maxfiles: N
#script: FILENAME
#exclude-path: PATHLIST
#pigz: N:
script: /usr/local/bin/vzdump-backup.pl
Finally, save and close the file.
After this step, rclone is properly hooked to the backup subsystem (vzdump) and is ready to mirror newly generated backups to HubiC.
Performing your first offsite backup
Before we can schedule our offsite backups, we need to test if the backup is actually working or not. For that we back up a single VM or CT guest and see if it copied to Hubic or not.
Go to the Proxmox VE web interface. From the left pane, select a guest and click ‘Backup’.
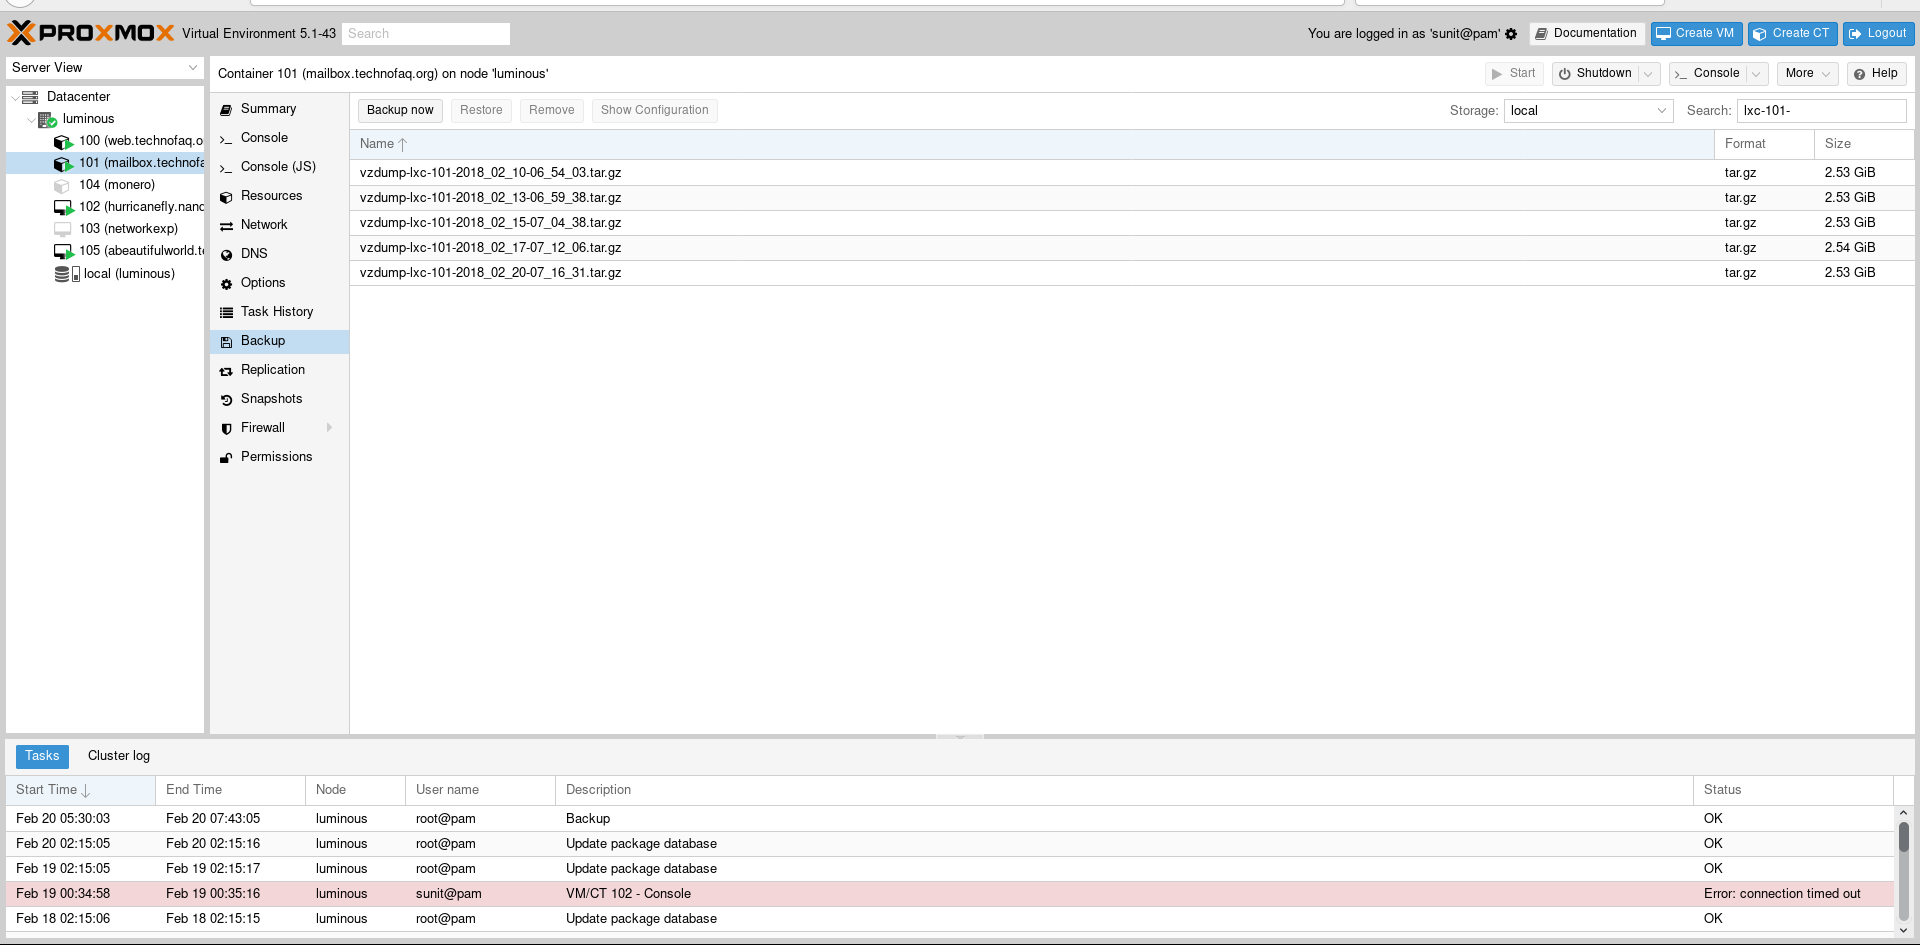
Once in the backup area where you can see all locally stored backups, click ‘Backup Now’.
In the options, choose the local backup location as ‘local’, choose mode as ‘Suspend’ for best success rate, and choose compression as GZIP to save bytes on storage and also type in your email to alert you in case of an error.
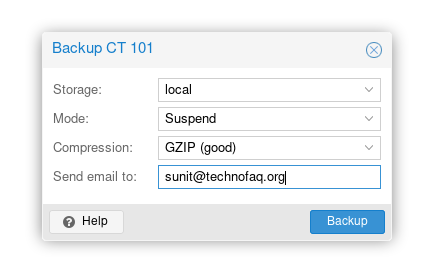
Finally, click ‘Backup’ on the prompt and monitor the progress.
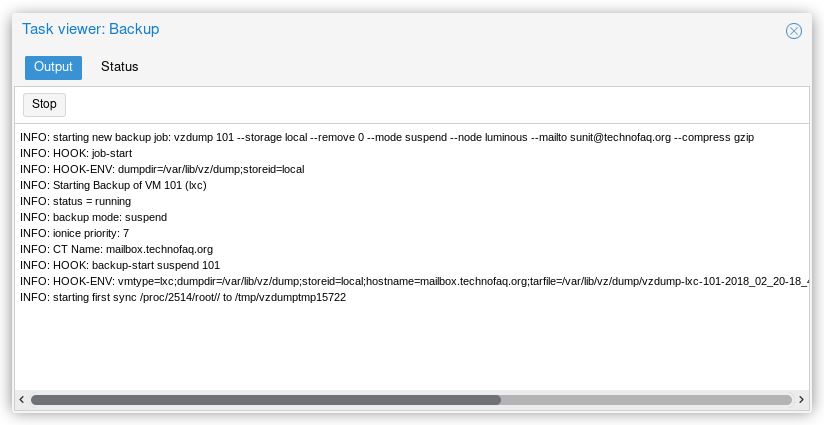
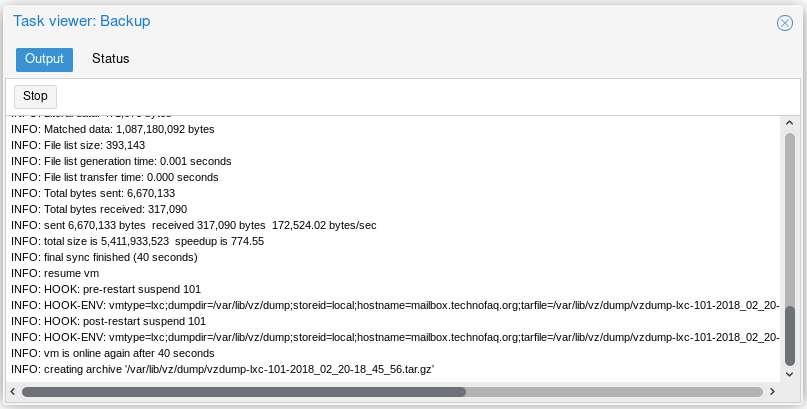
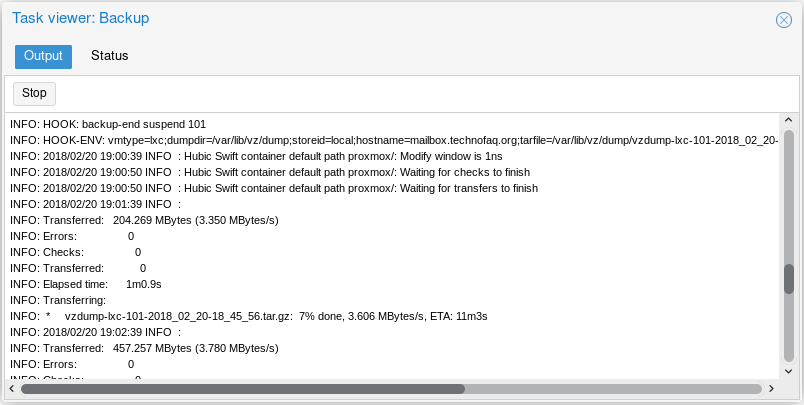
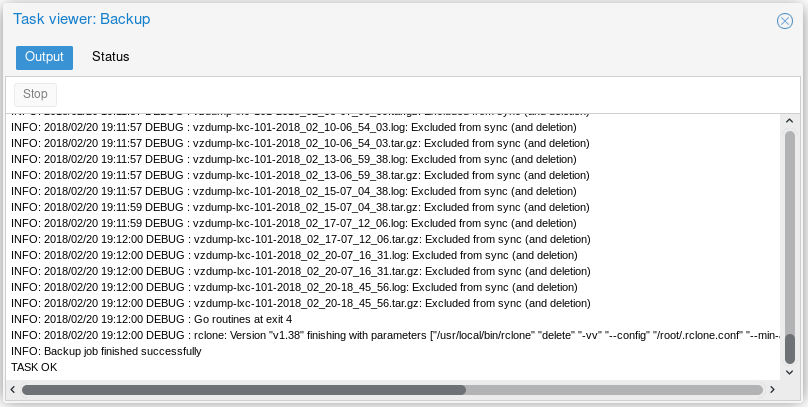
An example of a successful backup log file is given below.
INFO: starting new backup job: vzdump 101 --storage local --remove 0 --mode suspend --node luminous --mailto [email protected] --compress gzip
INFO: HOOK: job-start
INFO: HOOK-ENV: dumpdir=/var/lib/vz/dump;storeid=local
INFO: Starting Backup of VM 101 (lxc)
INFO: status = running
INFO: backup mode: suspend
INFO: ionice priority: 7
INFO: CT Name: mailbox.technofaq.org
INFO: HOOK: backup-start suspend 101
INFO: HOOK-ENV: vmtype=lxc;dumpdir=/var/lib/vz/dump;storeid=local;hostname=mailbox.technofaq.org;tarfile=/var/lib/vz/dump/vzdump-lxc-101-2018_02_20-18_45_56.tar.gz;logfile=/var/lib/vz/dump/vzdump-lxc-101-2018_02_20-18_45_56.log
INFO: starting first sync /proc/2514/root// to /tmp/vzdumptmp15722
INFO: Number of files: 225,132 (reg: 189,245, dir: 27,851, link: 8,002, dev: 2, special: 32)
INFO: Number of created files: 225,131 (reg: 189,245, dir: 27,850, link: 8,002, dev: 2, special: 32)
INFO: Number of deleted files: 0
INFO: Number of regular files transferred: 189,228
INFO: Total file size: 5,411,979,064 bytes
INFO: Total transferred file size: 5,407,621,380 bytes
INFO: Literal data: 5,407,635,595 bytes
INFO: Matched data: 0 bytes
INFO: File list size: 8,846,542
INFO: File list generation time: 0.024 seconds
INFO: File list transfer time: 0.000 seconds
INFO: Total bytes sent: 5,423,057,327
INFO: Total bytes received: 3,784,249
INFO: sent 5,423,057,327 bytes  received 3,784,249 bytes  12,694,366.26 bytes/sec
INFO: total size is 5,411,979,064  speedup is 1.00
INFO: first sync finished (427 seconds)
INFO: suspend vm
INFO: HOOK: pre-stop suspend 101
INFO: HOOK-ENV: vmtype=lxc;dumpdir=/var/lib/vz/dump;storeid=local;hostname=mailbox.technofaq.org;tarfile=/var/lib/vz/dump/vzdump-lxc-101-2018_02_20-18_45_56.tar.gz;logfile=/var/lib/vz/dump/vzdump-lxc-101-2018_02_20-18_45_56.log
INFO: starting final sync /proc/2514/root// to /tmp/vzdumptmp15722
INFO: Number of files: 225,130 (reg: 189,243, dir: 27,851, link: 8,002, dev: 2, special: 32)
INFO: Number of created files: 0
INFO: Number of deleted files: 2 (reg: 2)
INFO: Number of regular files transferred: 5
INFO: Total file size: 5,411,933,523 bytes
INFO: Total transferred file size: 1,087,651,167 bytes
INFO: Literal data: 471,075 bytes
INFO: Matched data: 1,087,180,092 bytes
INFO: File list size: 393,143
INFO: File list generation time: 0.001 seconds
INFO: File list transfer time: 0.000 seconds
INFO: Total bytes sent: 6,670,133
INFO: Total bytes received: 317,090
INFO: sent 6,670,133 bytes  received 317,090 bytes  172,524.02 bytes/sec
INFO: total size is 5,411,933,523  speedup is 774.55
INFO: final sync finished (40 seconds)
INFO: resume vm
INFO: HOOK: pre-restart suspend 101
INFO: HOOK-ENV: vmtype=lxc;dumpdir=/var/lib/vz/dump;storeid=local;hostname=mailbox.technofaq.org;tarfile=/var/lib/vz/dump/vzdump-lxc-101-2018_02_20-18_45_56.tar.gz;logfile=/var/lib/vz/dump/vzdump-lxc-101-2018_02_20-18_45_56.log
INFO: HOOK: post-restart suspend 101
INFO: HOOK-ENV: vmtype=lxc;dumpdir=/var/lib/vz/dump;storeid=local;hostname=mailbox.technofaq.org;tarfile=/var/lib/vz/dump/vzdump-lxc-101-2018_02_20-18_45_56.tar.gz;logfile=/var/lib/vz/dump/vzdump-lxc-101-2018_02_20-18_45_56.log
INFO: vm is online again after 40 seconds
INFO: creating archive '/var/lib/vz/dump/vzdump-lxc-101-2018_02_20-18_45_56.tar.gz'
INFO: Total bytes written: 5788252160 (5.4GiB, 14MiB/s)
INFO: archive file size: 2.54GB
INFO: HOOK: backup-end suspend 101
INFO: HOOK-ENV: vmtype=lxc;dumpdir=/var/lib/vz/dump;storeid=local;hostname=mailbox.technofaq.org;tarfile=/var/lib/vz/dump/vzdump-lxc-101-2018_02_20-18_45_56.tar.gz;logfile=/var/lib/vz/dump/vzdump-lxc-101-2018_02_20-18_45_56.log
INFO: 2018/02/20 19:00:39 INFO  : Hubic Swift container default path proxmox/: Modify window is 1ns
INFO: 2018/02/20 19:00:50 INFO  : Hubic Swift container default path proxmox/: Waiting for checks to finish
INFO: 2018/02/20 19:00:50 INFO  : Hubic Swift container default path proxmox/: Waiting for transfers to finish
INFO: 2018/02/20 19:01:39 INFO  :
INFO: Transferred:   204.269 MBytes (3.350 MBytes/s)
INFO: Errors:                 0
INFO: Checks:                 0
INFO: Transferred:            0
INFO: Elapsed time:      1m0.9s
INFO: Transferring:
INFO:  *     vzdump-lxc-101-2018_02_20-18_45_56.tar.gz:  7% done, 3.606 MBytes/s, ETA: 11m3s
INFO: 2018/02/20 19:02:39 INFO  :
INFO: Transferred:   457.257 MBytes (3.780 MBytes/s)
INFO: Errors:                 0
INFO: Checks:                 0
INFO: Transferred:            0
INFO: Elapsed time:      2m0.9s
INFO: Transferring:
INFO:  *     vzdump-lxc-101-2018_02_20-18_45_56.tar.gz: 17% done, 4.222 MBytes/s, ETA: 8m26s
INFO: 2018/02/20 19:03:39 INFO  :
INFO: Transferred:   804.840 MBytes (4.447 MBytes/s)
INFO: Errors:                 0
INFO: Checks:                 0
INFO: Transferred:            0
INFO: Elapsed time:      3m0.9s
INFO: Transferring:
INFO:  *     vzdump-lxc-101-2018_02_20-18_45_56.tar.gz: 30% done, 5.894 MBytes/s, ETA: 5m4s
INFO: 2018/02/20 19:04:39 INFO  :
INFO: Transferred:   1.114 GBytes (4.734 MBytes/s)
INFO: Errors:                 0
INFO: Checks:                 0
INFO: Transferred:            0
INFO: Elapsed time:      4m0.9s
INFO: Transferring:
INFO:  *     vzdump-lxc-101-2018_02_20-18_45_56.tar.gz: 43% done, 5.427 MBytes/s, ETA: 4m28s
INFO: 2018/02/20 19:05:39 INFO  :
INFO: Transferred:   1.456 GBytes (4.955 MBytes/s)
INFO: Errors:                 0
INFO: Checks:                 0
INFO: Transferred:            0
INFO: Elapsed time:      5m0.9s
INFO: Transferring:
INFO:  *     vzdump-lxc-101-2018_02_20-18_45_56.tar.gz: 57% done, 5.821 MBytes/s, ETA: 3m9s
INFO: 2018/02/20 19:06:39 INFO  :
INFO: Transferred:   1.800 GBytes (5.107 MBytes/s)
INFO: Errors:                 0
INFO: Checks:                 0
INFO: Transferred:            0
INFO: Elapsed time:      6m0.9s
INFO: Transferring:
INFO:  *     vzdump-lxc-101-2018_02_20-18_45_56.tar.gz: 70% done, 6.019 MBytes/s, ETA: 2m5s
INFO: 2018/02/20 19:07:39 INFO  :
INFO: Transferred:   2.149 GBytes (5.228 MBytes/s)
INFO: Errors:                 0
INFO: Checks:                 0
INFO: Transferred:            0
INFO: Elapsed time:      7m0.9s
INFO: Transferring:
INFO:  *     vzdump-lxc-101-2018_02_20-18_45_56.tar.gz: 84% done, 5.891 MBytes/s, ETA: 1m7s
INFO: 2018/02/20 19:08:39 INFO  :
INFO: Transferred:   2.502 GBytes (5.328 MBytes/s)
INFO: Errors:                 0
INFO: Checks:                 0
INFO: Transferred:            0
INFO: Elapsed time:      8m0.9s
INFO: Transferring:
INFO:  *     vzdump-lxc-101-2018_02_20-18_45_56.tar.gz: 98% done, 6.088 MBytes/s, ETA: 5s
INFO: 2018/02/20 19:09:19 INFO  : vzdump-lxc-101-2018_02_20-18_45_56.tar.gz: Copied (new)
INFO: 2018/02/20 19:09:19 INFO  :
INFO: Transferred:   2.536 GBytes (4.987 MBytes/s)
INFO: Errors:                 0
INFO: Checks:                 0
INFO: Transferred:            1
INFO: Elapsed time:     8m40.7s
INFO: Finished Backup of VM 101 (00:23:53)
INFO: HOOK: log-end suspend 101
INFO: HOOK-ENV: vmtype=lxc;dumpdir=/var/lib/vz/dump;storeid=local;hostname=mailbox.technofaq.org;tarfile=/var/lib/vz/dump/vzdump-lxc-101-2018_02_20-18_45_56.tar.gz;logfile=/var/lib/vz/dump/vzdump-lxc-101-2018_02_20-18_45_56.log
INFO: 2018/02/20 19:09:54 INFO  : Hubic Swift container default path proxmox/: Modify window is 1ns
INFO: 2018/02/20 19:10:35 INFO  : Hubic Swift container default path proxmox/: Waiting for checks to finish
INFO: 2018/02/20 19:10:35 INFO  : Hubic Swift container default path proxmox/: Waiting for transfers to finish
INFO: 2018/02/20 19:10:37 INFO  : vzdump-lxc-101-2018_02_20-18_45_56.log: Copied (new)
INFO: 2018/02/20 19:10:37 INFO  :
INFO: Transferred:   9.071 kBytes (198 Bytes/s)
INFO: Errors:                 0
INFO: Checks:                 0
INFO: Transferred:            1
INFO: Elapsed time:       46.8s
INFO: HOOK: job-end
INFO: HOOK-ENV: dumpdir=/var/lib/vz/dump;storeid=local
INFO: 2018/02/20 19:10:37 DEBUG : Using config file from "/root/.rclone.conf"
INFO: 2018/02/20 19:10:37 DEBUG : --min-age 2880h0m0s to 2017-10-23 19:10:37.20637049 +0530 IST m=-10367999.995914836
INFO: 2018/02/20 19:10:37 DEBUG : rclone: Version "v1.38" starting with parameters ["/usr/local/bin/rclone" "delete" "-vv" "--config" "/root/.rclone.conf" "--min-age" "120d" "hubic:default/proxmox/"]
INFO: 2018/02/20 19:10:37 DEBUG : Hubic: Got swift credentials (expiry 2018-02-21 01:40:31 +0100 +0100 in 10h59m53.540960942s)
INFO: 2018/02/20 19:10:37 INFO  : Hubic Swift container default path proxmox/: Modify window is 1ns
INFO: 2018/02/20 19:10:37 INFO  : Waiting for deletions to finish
INFO: 2018/02/20 19:11:54 DEBUG : vzdump-lxc-101-2018_02_01-07_01_51.log: Excluded from sync (and deletion)
INFO: 2018/02/20 19:11:54 DEBUG : vzdump-lxc-101-2018_02_01-07_01_51.tar.gz: Excluded from sync (and deletion)
INFO: 2018/02/20 19:11:54 DEBUG : vzdump-lxc-101-2018_02_03-07_18_17.log: Excluded from sync (and deletion)
INFO: 2018/02/20 19:11:54 DEBUG : vzdump-lxc-101-2018_02_03-07_18_17.tar.gz: Excluded from sync (and deletion)
INFO: 2018/02/20 19:11:56 DEBUG : vzdump-lxc-101-2018_02_06-07_10_51.log: Excluded from sync (and deletion)
INFO: 2018/02/20 19:11:56 DEBUG : vzdump-lxc-101-2018_02_06-07_10_51.tar.gz: Excluded from sync (and deletion)
INFO: 2018/02/20 19:11:57 DEBUG : vzdump-lxc-101-2018_02_08-07_06_09.log: Excluded from sync (and deletion)
INFO: 2018/02/20 19:11:57 DEBUG : vzdump-lxc-101-2018_02_08-07_06_09.tar.gz: Excluded from sync (and deletion)
INFO: 2018/02/20 19:11:57 DEBUG : vzdump-lxc-101-2018_02_10-06_54_03.log: Excluded from sync (and deletion)
INFO: 2018/02/20 19:11:57 DEBUG : vzdump-lxc-101-2018_02_10-06_54_03.tar.gz: Excluded from sync (and deletion)
INFO: 2018/02/20 19:11:57 DEBUG : vzdump-lxc-101-2018_02_13-06_59_38.log: Excluded from sync (and deletion)
INFO: 2018/02/20 19:11:57 DEBUG : vzdump-lxc-101-2018_02_13-06_59_38.tar.gz: Excluded from sync (and deletion)
INFO: 2018/02/20 19:11:57 DEBUG : vzdump-lxc-101-2018_02_15-07_04_38.log: Excluded from sync (and deletion)
INFO: 2018/02/20 19:11:59 DEBUG : vzdump-lxc-101-2018_02_15-07_04_38.tar.gz: Excluded from sync (and deletion)
INFO: 2018/02/20 19:11:59 DEBUG : vzdump-lxc-101-2018_02_17-07_12_06.log: Excluded from sync (and deletion)
INFO: 2018/02/20 19:12:00 DEBUG : vzdump-lxc-101-2018_02_17-07_12_06.tar.gz: Excluded from sync (and deletion)
INFO: 2018/02/20 19:12:00 DEBUG : vzdump-lxc-101-2018_02_20-07_16_31.log: Excluded from sync (and deletion)
INFO: 2018/02/20 19:12:00 DEBUG : vzdump-lxc-101-2018_02_20-07_16_31.tar.gz: Excluded from sync (and deletion)
INFO: 2018/02/20 19:12:00 DEBUG : vzdump-lxc-101-2018_02_20-18_45_56.log: Excluded from sync (and deletion)
INFO: 2018/02/20 19:12:00 DEBUG : vzdump-lxc-101-2018_02_20-18_45_56.tar.gz: Excluded from sync (and deletion)
INFO: 2018/02/20 19:12:00 DEBUG : Go routines at exit 4
INFO: 2018/02/20 19:12:00 DEBUG : rclone: Version "v1.38" finishing with parameters ["/usr/local/bin/rclone" "delete" "-vv" "--config" "/root/.rclone.conf" "--min-age" "120d" "hubic:default/proxmox/"]
INFO: Backup job finished successfully
TASK OK
We have finally tested and determined that offsite backups are working as expected. Let’s move on to the final step.
Scheduling backups
Proxmox VE has scheduled backup option right in the web interface. Just click ‘Datacenter’ in the left pane. Then click ‘Backup’. After that, click, ‘Add’ to insert a new backup schedule.

Select the local storage, days of the week, start time, compression, backup mode and the guests you want to take a backup of. Also enter your email for email notifications. Finally, click OK.
That’s it folks! According to the schedule you specified, Proxmox VE will back up your VMs and CTs and also make a copy of them on your HubiC cloud storage.
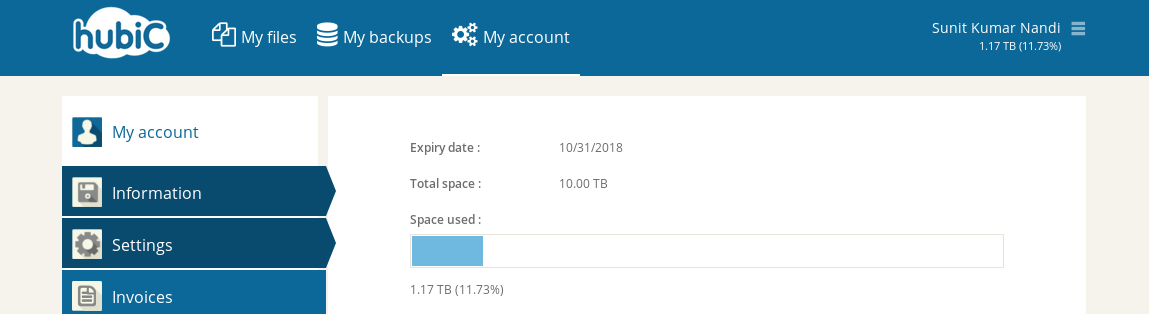
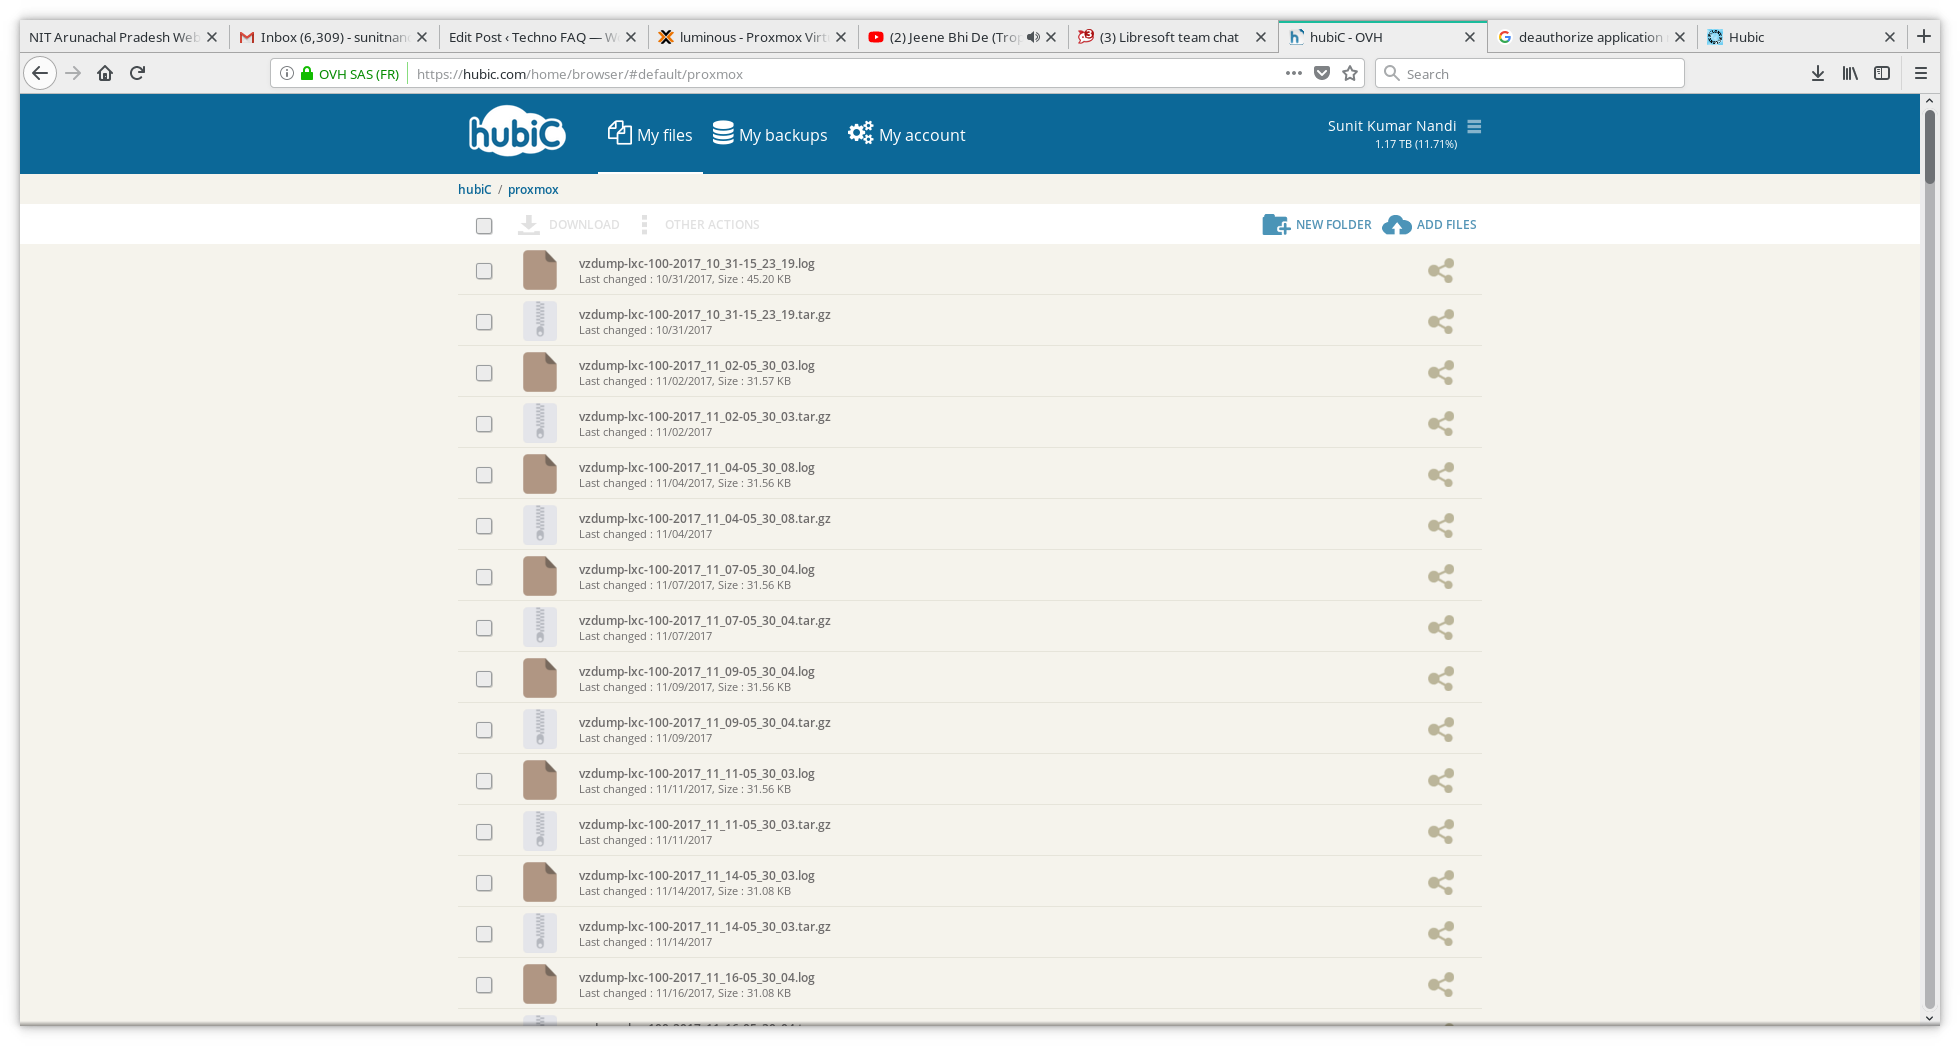
If you ever log in to the Hubic web interface and browse to ‘proxmox’ folder, you’ll see all your backups available. To download the backup to your computer, just click on it.
Conclusion
After following all the steps above, you’ll have a fully working, reliable and cheap backup plan that will protect you in any data loss or catastrophe. Now you can rest assured that your VMs and CTs are duplicated and easily restorable even if your server is wiped out. Apart from HubiC, rclone supports a variety of other remote storages, so using a different storage provider is merely performing the aforementioned steps with modifications to the configuration and location values. If encryption is required, rclone even has a crypt remote that encrypts and decrypts access to a cloud storage on the fly.
I hope you liked this guide. I have tried to be as detailed and comprehensive as possible. If you want to suggest any improvements or corrections, please feel free to leave a comment below.